This is a prime example of why a public jira is a VERY GOOD THING. I would have been thoroughly perplexed by the entire problem AND would have taken much longer (if ever) finding the solution without the ability to browse preexisting jiras for this problem. (I made an assumption that was incorrect, because it made logical sense to work that way, and no logical sense to work the way it does. And computers are all about logic, right?)
The problem: you can upload multiple separate mesh objects at once into one linked object (this is great for, say, everything already being in the right place instead of having to line shit up! Hooray!). HOWEVER, when one does this and attempts to also upload your own custom LODs and physics shapes, the objects do not always line up! This leads to lower LODs being wacky shapes, or just plain saying "nope, not doing it" if you don't have the same material setup on them all (texture faces). So....you can upload multiple items and have them all in the right places in respect to each other OR you can have control over your LODs. Not both. (As an aside, the auto generated LODs seem to trim off the objects semi randomly- sometimes one object will get the LOD jacked down a lot, and the other will be barely touched, it doesn't seem to do it evenly.)
The Real problem: the collada exporters just randomly decide on an order for your objects in the file, not based on order selected or any other criteria over which you have control. This definitely holds true for the blender 2.62 exporter- but it is not alone, other programs also have this issue.
The solution: reorder your collada file by hand. First step, in your modeling program, before exporting, name all your objects useful names. You need to be able to distinguish what is the same object in different LODs by name only, so keep that nice and consistent! Export your collada file now that everything is named and easy to tell apart blind. Use a basic basic text editor (WordPad works perfectly), open up your dae file. It's a bunch of xml code in there, nested <type> <subtype>. Now, you're on your own here a bit, because collada files vary WILDLY in what they call things and how they're ordered.
There's going to be material data in there (probably), which you can just skip by. You're looking for geometry or something similar. In my current exporter, I'm looking for <geometry id="object_name" name="object_name"> (Note: those names don't have to be the same, and they are things you set, so you should know what names you're looking for). There will be a bunch of nested attributes, and then a close geometry tag, and then another open tag with a new name for the next data block. Find out what order your data blocks are in there! Then open up another LOD file, scroll down to the same geometry blocks, and reorder each entire block into the same order as the first file- repeat for all LODs (the ENTIRE block needs to be moved, from start to end tag for an object). Save the newly reordered files (just as text, don't let it do anything fancy, don't rename from .dae). Now they should line up so the objects agree across LODs instead of randomly assigning!
Showing posts with label blender. Show all posts
Showing posts with label blender. Show all posts
Wednesday, September 19, 2012
Friday, December 30, 2011
Adventures in Exporting
This is a run down of my personal glitches with the collada exporters in Blender. Your builds may not have the same problems, but I had to stumble around in the dark to find the ways around mine, so if these issues are plaguing you too, might be worth a try. This is not telling you how to export in Blender, or how to use Blender, it assumes you know that already- just that you are having these particular export glitches when doing it.
I primarily use Blender 2.49 (an old Jass build, that's long since not been available for download. It's comfortable for me, it predates Primstar, and it doesn't have some of the other glitches/intentional refusing to do what I want that was introduced that messed up my workflow). I haven't really jumped on the 2.5 bandwagon much yet, 2.49 does what I want, how I want it, and I haven't spent the time to find the way to work around 2.5 (just trying to cam around in it irks me with the new settings, and I haven't spent the time to get used to it or change it!)
Around half the time, exporting with the collada 1.4 exporter works just fine. The other half...it randomly divides out a few faces and assigns them to new texture space (the closest to tracking down any reason behind which faces it chooses I've come to is that sometimes, but only sometimes, when I merge edges, it glitches some of the faces to one side into a new texture space). This is NOT visible in Blender- it assigns texture faces just as you would expect, you only find out when uploading the collada and either the uploader fails because your models do not all have the same texture faces (or have too many- also note that you actually have to have all the _same_ textures assigned, not just the same number as well- or at least I do!), or you get it uploaded and find out you've got some straggler faces sprinkled around here and there that have a different texture face.
I've tried all sorts of ridiculous and time consuming experimentation with trying to track those down, fix them, replaced my collada exporting scripts with new versions, all to no avail. Finally I found one thing that actually fixed it: opening that blend file in Blender 2.5, and exporting in there.
BUT. The collada exporter in Blender 2.5 is twitchier. You MUST always make sure to tick the "export only selected" box in the file popup or it will export your entire blender scene with all pages in one piece (with my workflow, extra pages have the other LODs and collision and in progress working bits, so it's an enormous mess). ADDITIONALLY. IT ONLY SOMETIMES DOES NOT EXPORT THE UNSELECTED THINGS ANYWAY. This last go round, it would export around half of the rest of the stuff that had nothing to do with what I wanted to export, even though it wasn't selected! It was a consistent half, but it was not a helpful half.
So, time for making a copy of your blend file so you don't save over and lose everything. Open that in Blender 2.5. Delete everything on ALL the other pages. Delete everything you DO NOT NEED on the page with what you want to export. IF YOU ARE EXPORTING RIGGED MESH, DO NOT DELETE THE SKELETON. It needs that for the skeleton data. The body you're building around? All that can go, but not the skeleton itself. (And make sure it's the right skeleton if you've duplicated things for alternate working versions, of course.)
Last note: current version of the SL mesh uploader seems to require the collision object to have the same number of texture faces (and the same textures!) assigned as the LODs. Previous versions of the uploader did not, future versions may not again. There is no reason for collision to require textures assigned, and there is no helpful red error message, the button to calculate and upload just silently disables itself.
Thursday, April 10, 2008
Blender, the avatar, and you.
You know those evil seams? Yeah, there are things that, while not perfect, can make it easier. With Blender, you can draw right on the avatar. Not with the same precision as a graphics program (in my experience, at least, maybe you're better at it), but for matching up stuff in the problem areas? 100% awesome.
I'm not super great at tutorials, because I tend to skip steps, but here's hoping this is something that isn't totally random. I'm going to try to give a really basic crash course to take you through the whole system. And hope I haven't forgotten steps on the way.
Download Blender, install and all that. Blender is a very weird program, but I think the installation was reasonably straightforward.
Download these avatar Blender files:
(Note: the first one may not be good. The second one is more useful, it should be good as of now, up to when they decide to nuke it again.)
Default model for cross section seams- the avatar on the green axis line has some sections joined crosswise. The one next to it is divided up into each image. Both are in the T pose, so shoulders are not as useful for how things will really hang.
Ruth in 3 poses- the mother of us all. I don't find the model you download off the website to actually be accurate, this is actually Ruth. This is entirely divided into the per images, there are no cross image sections. Also, her feet are the Ruthfeet size, so don't sculpt shoes around it unless you're willing for them to not be size 0. Yes, one of them has shoe morphed feet with max height anyway. This is better for things you want to see the sleeves in, as well as being a nice way to preview what something will look like before importing to SL, if you don't have the clothing previewer (which I think you ought to, personally! I don't know how I could live without it, even with this. It's far more lightweight and compact for previewing). (Bonus for skinners and the like: the eyelashes should be connected properly, and the eyes are also included as a separate texture mapped thingie.)
I'll be working on more avatar models (including guys) to make seeing where things really go easier eventually. You can use the male model off of the website (note: you will have to do a lot of prep, including importing the .obj, which requires a plugin), but I find that it doesn't map particularly true in a lot of areas.
Open the file of choice. Now the fun starts, because there are a jillion and 4 options in Blender, and it can be daunting. Below the black avatar wireframes, there should be a menu. You should be in Object Mode, which is what you need to switch to any time you want to choose which part of the model you want to work on.
First, a note on camera: Hold down Alt, and the mouse button, and you rotate around. Alt+Shift and mouse, and Alt+Ctrl and mouse move different ways (drag around the scene, zoom in/out). I just hold down alt and play around with the others to see what's what, since everything has to use a different camera and it's hard to keep straight! If you've got a mouse with a scrolly wheel, that also zooms in and out (generally, mouse settings vary and all).
Here, have a picture that may not help much that I've scribbled all over:
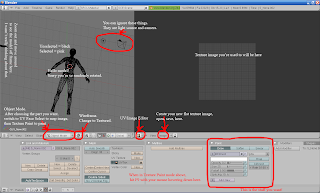
I've spliced the bottom there in while in Texture Paint, you can't see all of those options while in Object Mode!
Choose the bit you want to work with, with the right button. If you want to join parts of the model together (note, this will mean they share texture images! So don't join unless you _want_ that), shift, select the other parts, and then Ctrl+J to join. Note: Blender does very weird sensitive submenus, if you mouse off of it before clicking to verify, it will not do what you ask! This includes things like saving! Joining is useful with the 3 avatar file, as you can join all the heads, all the torsos, all the legs, and they will all update at once. Currently they are each separate.
The new version of Blender has done away with UV Face Select mode, and collapsed it into Edit mode. Change everywhere I say "UV Face Select" to "Edit Mode" if your version of Blender doesn't have UV Face Select.
Once you've got your selection, go to the Object Mode dropdown, and choose UV Face Select. Now, the windows should all be set up such that in the next panel, you will now see the UV outlines for that piece laid out in that space (this is the UV/Image Editor mode, which only has a face icon visible, click on the dropdown to see the name). If that panel does not have them outlined, hover over the avatar and press A (select all, which toggles selection on and off). It should be selected unless you've clicked off of it. At any time you can unselect a section, if you've clicked on one face, and then select the entire model by pressing A twice (yes, just A, no shift, control, or alt. And you have to have your mouse hovering that section). Your image will not be applied to the entire model, unless the entire model is selected. That includes not being able to draw on it, even though it looks like it's right there.
If you are using the cross image seamed avatar, the stomach will have lines at the bottom, and the pelvis at the top, but the legs and arms and such won't be there! This way we can draw across it all on one image, and it will update top and bottom. You'll have to divide these out later, as well as the fact it won't do anything about the parts that aren't outlined there. (Note: I tend to not do this that much actually due to laziness, since I have to splice out the pieces back to where they belong. Your mileage may vary.)
In the panel with the UV map laid out, go to the Image menu, New, or Open (note: I think it only accepts tgas, but it ignores transparency entirely1, so denote that with a contrasting colour when working on it), and either create a new image of your choice or import something you want to check. Remember, if you're doing the stomach/pelvis, you will have had to prep an image to have both of the necessary pieces in it, that you will divide back up again later.
1This is no longer true in newer versions of Blender. It DOES do transparency, so save your working copies as 24 bit tgas, or don't drop your channel in. Transparency is awesome for trying to get the $*%@#! skirt mesh to line up, crap for everything else.
The image should now appear under the UV map. To get it to appear on your avatar, in the menu under it, there is a strange outlined box thing next to UV Face Select. Click on that dropdown, and choose Textured.
To actually _do_ something with all of this, change UV Face Select to Texture Paint. Hit A to deselect the model so you can see it better. The vertex lines will still be there. If you want them to go away, switch to Object Mode and then to Texture Paint (don't change your selection any), and it will just outline the entire thing in a light pink line around the area you're working on. Both things have their uses.
In the bottom panel that has all that scary menu text, hover your mouse, and hit F9. The Paint panel lets you choose paint colour, opacity, brush size, and all that fun stuff. Draw all over the avatar! Once you're done, go back to that Image menu where you created a new image or opened one you already had, and save it. Blender WILL let you close things without saving! It does not prompt!
If you want to save what you've done with the model as a whole, for instance the joining, you can save it under the File menu. As I said before, Blender does not prompt for saving if you've changed anything!
It actually is less complicated than it looks, once you've done it a few times!
Monday, January 7, 2008
Texturing the Avatar with Blender
You should know basics of texturing first- see Natalia Zelmanov's tutorials, they are quite well done.
Mostly I recommend this for seam matching and some previewing, I, at least, don't have the sort of fine control to want to use Blender to do the whole thing (especially without layers!), but seams can be a bitch (although I did just paint a sculpty in Blender, and he came out pretty nice really- but still, I did a little bit of post processing in Photoshop to make it all happy and right). I just figured out how to maybe make them less bitchy! I would have loved knowing this forever ago. But at least now I have hope with this damn corset that's been giving me a headache and still not quite working with massive amounts of guessing and zooming and pixel tweaking (stupid complex irregular pattern).
Go to the SL site and download the avatar mesh, if you haven't. Mostly you will have it somewhere, in some form, because you're using something to preview it unless you really are crazy and like working without a net (I do all my previewing with the SL Clothing Previewer- it isn't perfect by any means, but it gives me enough of an idea I can manage in most cases), but basically, you need a file that ends in .obj that has the avatar mesh (male or female, I always work on female because I find it wraps a bit more accurately to SL, although still not accurate, especially around the face).
Go to the Blender importer page and grab the Wavefront obj one, and put in your Program Files\Blender Foundation\Blender\.blender\scripts directory, as previously stated in the av painting intro.
Delete the cylinder that's probably there with the delete key (and say yes...Blender's popups sure can be annoying). Go through the same annoying importing in Blender: File->Import->Wavefront (.obj), navigate the clunky file navigation, don't move your cursor because the popup window will go away and leave you wondering why everything's broken, say ok to the popup at default values. Now you should have a teensy tiny person. Zoom in (remember nav keys are holding down alt and nothing, shift, or ctrl, and the left mouse button, as well as the middle scrollwheel doing strange and potentially useful things). You're still in Object Mode, so select the pieces you want to match seams on. For matching the waist seams, select the stomach and then shift select the pelvis to have both of them highlighted, and ctrl-J to join them into one (say yes to another annoying popup). GLEE. Now that horrible awkward seam there can be painted directly on! (Do a separate join and image for the arm and shoulder seams, so you don't have things overlapping on the UV map, since those are also one of the horrible things, same with legs.)
With your stomachpelvis selected still, choose UV Face Select Mode in the dropdown menu. In the dropdown next to it, pick Textured, the weird nobbly thing at the top. Your second window, as always, should be the UV/Image Editor, and you should see odd highlighted outlines of the stomach and the pelvis, in the places in the image that they are in the map files we get to do all of our mapping from.
Now, your choice: you probably have something that just needs some seam fixing, so take the pelvis part of that and paste it in the proper place at the top over an image that has the stomach part, and Open that image in the UV/Image Editor; or you can just paint the whole thing directly onto the avatar mesh in Blender. Me, I'll be going with option 1, because I am far more comfortable with my lots of layers and things in Photoshop. (When doing the shoulder/arm seams you can just grab an upper body texture without the splicing, since it's all in one image to begin with.)
Hit A to deselect all, so you can see what you're doing better (The light grey lines are still slightly annoying, but they do show you were you need to pay attention to, and they aren't super huge), and change the UV/Face Select panel with your 3D view to Texture Paint Mode. In the Buttons panel with all the menu options, hit F9 to go to Editting, and play around with your brush settings in the Paint panel.
I'll be importing particular layers with the parts (wrinkles, etc.) that go over the edges, not the finished product, myself (both so I can keep working with all my layers, and so it's easier to finish the fine tuning fixing). Also, note that it doesn't always do the very edge that's only a partial pixel- keep in mind that you will probably still need to clean up and expand those parts to make them work properly (especially with shrinking down, since you ought to be working at 1024, at least), as well as the fact it tends to do hard pixely edges if you've dropped your brush small enough for detail work. Once you've finished with this image, Save it off in the UV/Image Editor window menu, and then you can move to cleanup in something else. Once you've done all that cleaning, import it again to make sure you've pulled things across properly.
It might be a good idea to save your joined up avatar for later, so you don't have to reimport and rejoin all the assorted bits. You may want two copies, one with the upper all together, and the lower all together, and a second with the upper/lower joins, since side seams are also a pain to align (this might speed up my guess, import to the clothing previewer, move one part one pixel up, import to clothing previewer, move one more pixel up and one over, import to clothing previewer...etc.)
Of course, there's also the importing into SL to take into account- things will not be as perfect there as they are here. For one, avatar textures get resized to 512, for another we have to deal with the crappy JPEG2000 compression. In fact, I find to match up my waist seams, I usually have to import the lower body that connects to an upper at 1024 (i.e. my corsets- they have enough fine detail it really does matter, the coats don't), just to trick the compression into being less awful (I upload everything else at 512, including lower bodies that don't need to match up exactly).
Subscribe to:
Posts (Atom)
