The new Materials feature has added in a number of new features- one being more control over alphas. We've only been asking for the ability to use 1 bit alpha masks since....the introduction of the stupid alpha flicker issue so, that's, what, 7 years? I don't even remember. It's been a long time. But we have them now, finally.
In the Texture panel in Build, there are more dropdowns and thingies now. Right now, we are interested in Materials, Texture (diffuse). Under that, Alpha mode, and the dropdown there gives us options, huzzah. Note: make sure you've selected a texture face with an alpha (transparency). No alpha, no options.
None just turns off the alpha channel, as if you uploaded a solid texture, no alpha channel at all.
Alpha blending is the default for textures with an alpha channel. This means an 8 bit alpha mask, gradual alpha transparencies with gradients, the old potential alpha flicker issue. They added an option in the Develop menu that would turn this "off" (make them 1 bit) for all alphas that were also set to 0% transparency a few viewer iterations ago, Develop>Rendering>Automatic Alpha Masks (non-deferred). THAT IS STILL THERE. THIS CAN SCREW STUFF UP. If that is checked, which it appears to still be by default, even if you have it SET to use 8 bit transparency, it won't- if it doesn't feel like it. Here's the fun part, kids, it used to always just set it to 1 bit, now it seems to decide for you, and it may not decide the way you want to. To force it to use 8 bit transparency, up the Transparency % to 1%. It's such a small bit you won't see it, but it will force it to use the alpha properly. Why is this a deal? Because any gradual transparencies will no longer be gradual. It will be on or off, sharp edges, no transparent glass or soft edges or shadows- when it decides you shouldn't have them. This is also a deal because it's set on the viewer side, NOT server side- so while you can set it in your viewer to show things the way you want, that doesn't guarantee what other people will see. And because it's viewer side, there's no way to really know where the cutoff is for everyone (especially once you get into the whole mac vs. windows vs. linux thing). Bright side? It does actually seem to be smart about it now, whereas before it just destroyed everything.
But! Now we have another problem. Full bright no longer consistently works on alpha blended textures- even ones the deferred rendering makes solid. For some people, it is never full bright, ever. For me? It is sometimes, and then not others, which is extra fun! Generally it is renders fullbright to begin with (but doesn't even always start out full bright), it will cease to once I select it, and stay that way until I reload the object entirely (tp out and back in, relog, etc.- toggling the Automatic Alpha Masks also seems to go back and forth between full bright and not, turning non-deferred on kills full bright). If you have alpha cutout vendors, this is a problem. One that you will want to fix by using Alpha masking instead- but you sacrifice all gradual transparencies once you use that.
Alpha masking is 1 bit transparency. This means everything is on/off, no gradient transparency. Thankfully, it isn't entirely pixel by pixel based, but will smooth out your angled lines on the cuts- just like Automatic Alpha Masks (non-deferred). Things that already used this are the avatar- alpha masks, and the edges of the system skirt when you had anything with a transparency- and system plants. Upside to this? No more alpha flicker! That's why we've wanted it forever! Also it's a little easier on the system in general, so it's a good idea to use it if you can get away with it anyway, but your alpha edges will be harsher, and smoothed angles still may not be actually straight, but may be lumpy. Still, full bright with alpha masking seems to work properly for everyone!
There is a slider under Alpha masking for Mask cutoff. This defaults to 0. Defaulting to 0 is stupid. That is just the same as setting it to None for the Alpha mode, it's solid. What you will almost always want is 127, that is the center of the range. Lower means more will be solid, higher means less will- if you have a haloing problem with your alphas, you'll probably want to set that number higher, possibly as close to 255 as you can without moth eating chunks in the middle unevenly. And you'll want to learn ways to avoid that haloing issue, see my previous post for some tips on that (though for solid cutouts, which is what you need here, taking pictures huge with antialiasing off, and shrinking after you've cut them out from the background will work, so long as you fill the empty background with something like the solidify filter with your alpha channel in an actual channel).
The last option is Emissive mask. This also turns your texture entirely solid. Full bright also completely destroys this option, because what it does is choose WHAT to make full bright. The solid parts of your texture will be fullbright- the transparent parts will be rendered with the surrounding lighting! It does not do gradual transparencies well/at all, and you can't adjust what it sees as solid/bright, so make sure you have a VERY clean mask before using. This and None are the least backwards compatible- it will just show the regular alphaed out texture if you are using a viewer without materials, both currently show no alpha, but also no emissive fullbright area, on a materials viewer with Advanced Lighting Model off.
Showing posts with label useful. Show all posts
Showing posts with label useful. Show all posts
Wednesday, June 26, 2013

Friday, October 26, 2012
Perfect alpha cutouts
Getting something cut out of a background in SL perfectly can be difficult and frustrating- unless you know the trick of it. Many people use the green screen trick, but you can have slight acid green bleed in your semi transparent areas, like hair whisps.
First requirement: you need to be able to take at least 2 completely identical pictures, aside from background colour (if there are flexis, you might want to turn them off after you've gotten everything into position, including your camera- Advanced menu>Rendering Features>Flexible Objects. This CAN be optional, your flexis might not move so long as nothing moves...but then again, they might, depending on settings and conditions)- and you need to be able to change that background colour.
Take one picture with your background solid fullbright white. Take a second picture identical but for the background being solid black. Optionally, take a third (or more) with the colour a general match for the touchy alpha issues- a vague match for your hair, any semi transparent spots, etc.
In Photoshop, one of the layer styles is "Difference"- copy paste the black or white background over the white or black background, and set the top layer to that. The image will be all black and white- the background will be white, everything else in the shot will be black, with perfect alphaed edges for cutouts. Select all and shift-copy, paste that into a channel mask for the image, and invert it, so it's a white outline on a black background. If your picture has shadows, you probably WILL still have to clean this up in minor ways, due to lines and shadows rendering differently on different backgrounds- make sure the places that should be solid are white, with no grey spots from shadows not rendering quite the same, and if you're taking larger than screen size, the line problem will have to be fixed. If you're not taking it with shadows on, your mask is already perfect- aside from occasional minor shiny glitches, so you might want to zoom in on those and make sure they're all white!
If your white and black aren't quite 100% pure (which can happen, even with fullbright- especially with shadows and Windlight), you may need to adjust the levels of your mask ever so slightly pulling the end arrow in to the center a tad. You should not need much, if you need this step at all- but you can have a slightly messy background mask that is mostly, but not 100%, transparent, under some circumstances (i.e. SL having a bad day).
Now, you can use this mask on your white background picture, your black background picture, or the picture(s) with the alpha colours. This last option works best- if you have multiple problem spots, layer them all only showing the bits you need where to prevent the colour bleed (if you're scaling the picture down, the colour bleed may disappear, depends on how much of a stickler you are as to how much effort to put in here- it's going to be minor even if you just use the white background version). If you have antialiasing on, there will be VERY slight bleed over the entire outline, so if you're wearing black, might want to do your cutout on the black background copy (black halo can also be less immediately noticeable than white, "shadows" rather than "halo"). But whatever you decide to cut out, use that channel mask for your selection or mask for your cutout!
First requirement: you need to be able to take at least 2 completely identical pictures, aside from background colour (if there are flexis, you might want to turn them off after you've gotten everything into position, including your camera- Advanced menu>Rendering Features>Flexible Objects. This CAN be optional, your flexis might not move so long as nothing moves...but then again, they might, depending on settings and conditions)- and you need to be able to change that background colour.
Take one picture with your background solid fullbright white. Take a second picture identical but for the background being solid black. Optionally, take a third (or more) with the colour a general match for the touchy alpha issues- a vague match for your hair, any semi transparent spots, etc.
In Photoshop, one of the layer styles is "Difference"- copy paste the black or white background over the white or black background, and set the top layer to that. The image will be all black and white- the background will be white, everything else in the shot will be black, with perfect alphaed edges for cutouts. Select all and shift-copy, paste that into a channel mask for the image, and invert it, so it's a white outline on a black background. If your picture has shadows, you probably WILL still have to clean this up in minor ways, due to lines and shadows rendering differently on different backgrounds- make sure the places that should be solid are white, with no grey spots from shadows not rendering quite the same, and if you're taking larger than screen size, the line problem will have to be fixed. If you're not taking it with shadows on, your mask is already perfect- aside from occasional minor shiny glitches, so you might want to zoom in on those and make sure they're all white!
If your white and black aren't quite 100% pure (which can happen, even with fullbright- especially with shadows and Windlight), you may need to adjust the levels of your mask ever so slightly pulling the end arrow in to the center a tad. You should not need much, if you need this step at all- but you can have a slightly messy background mask that is mostly, but not 100%, transparent, under some circumstances (i.e. SL having a bad day).
Now, you can use this mask on your white background picture, your black background picture, or the picture(s) with the alpha colours. This last option works best- if you have multiple problem spots, layer them all only showing the bits you need where to prevent the colour bleed (if you're scaling the picture down, the colour bleed may disappear, depends on how much of a stickler you are as to how much effort to put in here- it's going to be minor even if you just use the white background version). If you have antialiasing on, there will be VERY slight bleed over the entire outline, so if you're wearing black, might want to do your cutout on the black background copy (black halo can also be less immediately noticeable than white, "shadows" rather than "halo"). But whatever you decide to cut out, use that channel mask for your selection or mask for your cutout!
Wednesday, September 19, 2012
Lining up LODs
This is a prime example of why a public jira is a VERY GOOD THING. I would have been thoroughly perplexed by the entire problem AND would have taken much longer (if ever) finding the solution without the ability to browse preexisting jiras for this problem. (I made an assumption that was incorrect, because it made logical sense to work that way, and no logical sense to work the way it does. And computers are all about logic, right?)
The problem: you can upload multiple separate mesh objects at once into one linked object (this is great for, say, everything already being in the right place instead of having to line shit up! Hooray!). HOWEVER, when one does this and attempts to also upload your own custom LODs and physics shapes, the objects do not always line up! This leads to lower LODs being wacky shapes, or just plain saying "nope, not doing it" if you don't have the same material setup on them all (texture faces). So....you can upload multiple items and have them all in the right places in respect to each other OR you can have control over your LODs. Not both. (As an aside, the auto generated LODs seem to trim off the objects semi randomly- sometimes one object will get the LOD jacked down a lot, and the other will be barely touched, it doesn't seem to do it evenly.)
The Real problem: the collada exporters just randomly decide on an order for your objects in the file, not based on order selected or any other criteria over which you have control. This definitely holds true for the blender 2.62 exporter- but it is not alone, other programs also have this issue.
The solution: reorder your collada file by hand. First step, in your modeling program, before exporting, name all your objects useful names. You need to be able to distinguish what is the same object in different LODs by name only, so keep that nice and consistent! Export your collada file now that everything is named and easy to tell apart blind. Use a basic basic text editor (WordPad works perfectly), open up your dae file. It's a bunch of xml code in there, nested <type> <subtype>. Now, you're on your own here a bit, because collada files vary WILDLY in what they call things and how they're ordered.
There's going to be material data in there (probably), which you can just skip by. You're looking for geometry or something similar. In my current exporter, I'm looking for <geometry id="object_name" name="object_name"> (Note: those names don't have to be the same, and they are things you set, so you should know what names you're looking for). There will be a bunch of nested attributes, and then a close geometry tag, and then another open tag with a new name for the next data block. Find out what order your data blocks are in there! Then open up another LOD file, scroll down to the same geometry blocks, and reorder each entire block into the same order as the first file- repeat for all LODs (the ENTIRE block needs to be moved, from start to end tag for an object). Save the newly reordered files (just as text, don't let it do anything fancy, don't rename from .dae). Now they should line up so the objects agree across LODs instead of randomly assigning!
The problem: you can upload multiple separate mesh objects at once into one linked object (this is great for, say, everything already being in the right place instead of having to line shit up! Hooray!). HOWEVER, when one does this and attempts to also upload your own custom LODs and physics shapes, the objects do not always line up! This leads to lower LODs being wacky shapes, or just plain saying "nope, not doing it" if you don't have the same material setup on them all (texture faces). So....you can upload multiple items and have them all in the right places in respect to each other OR you can have control over your LODs. Not both. (As an aside, the auto generated LODs seem to trim off the objects semi randomly- sometimes one object will get the LOD jacked down a lot, and the other will be barely touched, it doesn't seem to do it evenly.)
The Real problem: the collada exporters just randomly decide on an order for your objects in the file, not based on order selected or any other criteria over which you have control. This definitely holds true for the blender 2.62 exporter- but it is not alone, other programs also have this issue.
The solution: reorder your collada file by hand. First step, in your modeling program, before exporting, name all your objects useful names. You need to be able to distinguish what is the same object in different LODs by name only, so keep that nice and consistent! Export your collada file now that everything is named and easy to tell apart blind. Use a basic basic text editor (WordPad works perfectly), open up your dae file. It's a bunch of xml code in there, nested <type> <subtype>. Now, you're on your own here a bit, because collada files vary WILDLY in what they call things and how they're ordered.
There's going to be material data in there (probably), which you can just skip by. You're looking for geometry or something similar. In my current exporter, I'm looking for <geometry id="object_name" name="object_name"> (Note: those names don't have to be the same, and they are things you set, so you should know what names you're looking for). There will be a bunch of nested attributes, and then a close geometry tag, and then another open tag with a new name for the next data block. Find out what order your data blocks are in there! Then open up another LOD file, scroll down to the same geometry blocks, and reorder each entire block into the same order as the first file- repeat for all LODs (the ENTIRE block needs to be moved, from start to end tag for an object). Save the newly reordered files (just as text, don't let it do anything fancy, don't rename from .dae). Now they should line up so the objects agree across LODs instead of randomly assigning!
Sunday, February 19, 2012
New Math
With meshes, we now have 2 ways to calculate prim count, old math (one prim = one prim), and new math (one prim = however many land impact prims depending on a number of variables). Any linkset linked to a mesh always uses new math (just one mesh in a linkset will force new math for the entire linkset, always). But you can choose to use new math on a linkset of traditional and sculpt prims as well.
But do that with care! There are reasons to do it, and reasons not to. Biggest reason to? In new math, a single prim can count as HALF a prim in a linkset, so one linkset of prims can be half the number of actual prims. Link six boxes and use new math? 3 land impact prims. (Note: this always rounds up. 5 prims will also be three prims, 7 prims will be 4). THIS ONLY APPLIES TO STATIC PRIMS. THEY CANNOT BE SCRIPTED OR PHYSICAL. It's a bonus modifier we get applied to "simple" prims, those that impact the server less.
However, new math is not straightforward like old math. There are 3 variables, and you have to figure out how to juggle them. Some people are just telling people to set entire linkset to Convex Hull and watch the savings: but if you don't have the right things in your linkset, your prims will count as MORE, and you may not be able to walk into your buildings anymore!
There is an easy way to find out what things will cost, and if it's worth trying (AND how to fix the not being able to walk into places problem). Click on the "More info" link to find out what your object will cost (it can take a bit to calculate though!):
 That will bring up this second menu with all your infomation. The thing I currently have selected is 3 prims. The three things that make a difference to us for prim count are Download, Physics, and Server. This Features tab, with the Physics Shape thing? That's where you need to set Physics shape to use new math. If all prims in a linkset are traditional prims, and use Prim physics, that linkset will use old math. If ANY prims in the linkset are set to either of the other two options (Convex Hull or None), the entire linkset will use new math- this is how you set non mesh prims to mesh math.
Download is how complicated the object is. It calculates by number of faces and size, complicated prims have more faces. Aside from replacing prims with less complicated ones, or shrinking prims, or removing complicated prims from the linkset entirely, we can't get this number any lower. Sculpts are a MINIMUM of 1.3 Download, even tiny, even with faces thrown away in the sculpt map (that, in fact, doesn't seem to have any impact to sculpt calculation ever- sculpts seem to have a flat calculation, regardless of the sculpt). And they go up from there. Linking 2 sculpts together will become 2.6- which will count as THREE prims. So only use sculpts with new math if you can balance the cost with other prims! Sculpts and toruses and spheres and tubes- anything other than boxes and prisms (and how often do you use a prism?)- can cost you, depending on size and complexity, they can cost too much. Boxes are cool. Boxes are 0.1, even at 64mx64mx64m, hollowed (even circle hollowed) and cut! (NOT twisted. Twisted ads a very substantial amount more to it, because it requires many more faces for the twist.) So, say you have a linkset with a bunch of boxes and a sculpt? You may find you can link that together and use new math and prim count goes down. But you may not.
Physics is where you can really play with your linkset cost. Simple physics (boxes! But not as much cutting or hollowing this time!) cost very little. Complicated physics, especially hollowed or cut things, even boxes, start costing. You can reduce physics cost by making things Convex Hull, but that makes them VERY simple: you will not be able to walk though hollows or cuts, and the actual outer shape beyond that may not be what you expect (it's not straight up bounding box all the time, but sometimes it is). You can reduce physics further by setting SELECTED PRIMS IN THE LINKSET to None. The root prim CANNOT be set to None. Physics set to None works like Phantom: so you can mix Phantom and non Phantom prims in a linkset this way too! Hollowed or cut prims for doorways may have to be set to None (you can set them to Prim so long as the rest of your Physics allows for the calculations). Many sculpts you may want to set to None to take them out of the Physics calculation, as well as not having their physics get in the way. You can set all the prims in the linkset individually to your choice of the three options, and you may need to! These example prims? I need to set my physics to Convex Hull or None to bring down my cost before I use new math, or not use new math at all, as well as linking them together (in practice? The base had to be set as Convex Hull, AND all the linked prims had to be set to None, before I could get the Physics low enough to see enough savings to actually lower the prim count. They are a sculpt and 2 cut tubes, so, complicated- but those cut tubes actually don't cost all that much at this size, so I can get away with it, so long as I don't need proper physics collision).
The last variable here is Display. That will NEVER be less than half the number of prims in your linkset. In this case 3 prims, divided by 2, equals 1.5. This is an unscripted unphysical linkset, so I get the static bonus. If this is equal to the number of actual prims, it's not worth trying to use the new math, because you won't see any savings!
The largest of these three numbers will always be the one used. The land impact number is rounded by linkset, 1.5 will be 2 land impact prims, but 1.4 will round down to 1.
A lot of land impact can be saved if you are smart in how you juggle your physics- and in what you link together! But that large sculpt? You may want to unlink that to leave it using old math and make sure you select it too before you move your thing.
But do that with care! There are reasons to do it, and reasons not to. Biggest reason to? In new math, a single prim can count as HALF a prim in a linkset, so one linkset of prims can be half the number of actual prims. Link six boxes and use new math? 3 land impact prims. (Note: this always rounds up. 5 prims will also be three prims, 7 prims will be 4). THIS ONLY APPLIES TO STATIC PRIMS. THEY CANNOT BE SCRIPTED OR PHYSICAL. It's a bonus modifier we get applied to "simple" prims, those that impact the server less.
However, new math is not straightforward like old math. There are 3 variables, and you have to figure out how to juggle them. Some people are just telling people to set entire linkset to Convex Hull and watch the savings: but if you don't have the right things in your linkset, your prims will count as MORE, and you may not be able to walk into your buildings anymore!
There is an easy way to find out what things will cost, and if it's worth trying (AND how to fix the not being able to walk into places problem). Click on the "More info" link to find out what your object will cost (it can take a bit to calculate though!):
Download is how complicated the object is. It calculates by number of faces and size, complicated prims have more faces. Aside from replacing prims with less complicated ones, or shrinking prims, or removing complicated prims from the linkset entirely, we can't get this number any lower. Sculpts are a MINIMUM of 1.3 Download, even tiny, even with faces thrown away in the sculpt map (that, in fact, doesn't seem to have any impact to sculpt calculation ever- sculpts seem to have a flat calculation, regardless of the sculpt). And they go up from there. Linking 2 sculpts together will become 2.6- which will count as THREE prims. So only use sculpts with new math if you can balance the cost with other prims! Sculpts and toruses and spheres and tubes- anything other than boxes and prisms (and how often do you use a prism?)- can cost you, depending on size and complexity, they can cost too much. Boxes are cool. Boxes are 0.1, even at 64mx64mx64m, hollowed (even circle hollowed) and cut! (NOT twisted. Twisted ads a very substantial amount more to it, because it requires many more faces for the twist.) So, say you have a linkset with a bunch of boxes and a sculpt? You may find you can link that together and use new math and prim count goes down. But you may not.
Physics is where you can really play with your linkset cost. Simple physics (boxes! But not as much cutting or hollowing this time!) cost very little. Complicated physics, especially hollowed or cut things, even boxes, start costing. You can reduce physics cost by making things Convex Hull, but that makes them VERY simple: you will not be able to walk though hollows or cuts, and the actual outer shape beyond that may not be what you expect (it's not straight up bounding box all the time, but sometimes it is). You can reduce physics further by setting SELECTED PRIMS IN THE LINKSET to None. The root prim CANNOT be set to None. Physics set to None works like Phantom: so you can mix Phantom and non Phantom prims in a linkset this way too! Hollowed or cut prims for doorways may have to be set to None (you can set them to Prim so long as the rest of your Physics allows for the calculations). Many sculpts you may want to set to None to take them out of the Physics calculation, as well as not having their physics get in the way. You can set all the prims in the linkset individually to your choice of the three options, and you may need to! These example prims? I need to set my physics to Convex Hull or None to bring down my cost before I use new math, or not use new math at all, as well as linking them together (in practice? The base had to be set as Convex Hull, AND all the linked prims had to be set to None, before I could get the Physics low enough to see enough savings to actually lower the prim count. They are a sculpt and 2 cut tubes, so, complicated- but those cut tubes actually don't cost all that much at this size, so I can get away with it, so long as I don't need proper physics collision).
The last variable here is Display. That will NEVER be less than half the number of prims in your linkset. In this case 3 prims, divided by 2, equals 1.5. This is an unscripted unphysical linkset, so I get the static bonus. If this is equal to the number of actual prims, it's not worth trying to use the new math, because you won't see any savings!
The largest of these three numbers will always be the one used. The land impact number is rounded by linkset, 1.5 will be 2 land impact prims, but 1.4 will round down to 1.
A lot of land impact can be saved if you are smart in how you juggle your physics- and in what you link together! But that large sculpt? You may want to unlink that to leave it using old math and make sure you select it too before you move your thing.
Friday, December 30, 2011
Adventures in Exporting
This is a run down of my personal glitches with the collada exporters in Blender. Your builds may not have the same problems, but I had to stumble around in the dark to find the ways around mine, so if these issues are plaguing you too, might be worth a try. This is not telling you how to export in Blender, or how to use Blender, it assumes you know that already- just that you are having these particular export glitches when doing it.
I primarily use Blender 2.49 (an old Jass build, that's long since not been available for download. It's comfortable for me, it predates Primstar, and it doesn't have some of the other glitches/intentional refusing to do what I want that was introduced that messed up my workflow). I haven't really jumped on the 2.5 bandwagon much yet, 2.49 does what I want, how I want it, and I haven't spent the time to find the way to work around 2.5 (just trying to cam around in it irks me with the new settings, and I haven't spent the time to get used to it or change it!)
Around half the time, exporting with the collada 1.4 exporter works just fine. The other half...it randomly divides out a few faces and assigns them to new texture space (the closest to tracking down any reason behind which faces it chooses I've come to is that sometimes, but only sometimes, when I merge edges, it glitches some of the faces to one side into a new texture space). This is NOT visible in Blender- it assigns texture faces just as you would expect, you only find out when uploading the collada and either the uploader fails because your models do not all have the same texture faces (or have too many- also note that you actually have to have all the _same_ textures assigned, not just the same number as well- or at least I do!), or you get it uploaded and find out you've got some straggler faces sprinkled around here and there that have a different texture face.
I've tried all sorts of ridiculous and time consuming experimentation with trying to track those down, fix them, replaced my collada exporting scripts with new versions, all to no avail. Finally I found one thing that actually fixed it: opening that blend file in Blender 2.5, and exporting in there.
BUT. The collada exporter in Blender 2.5 is twitchier. You MUST always make sure to tick the "export only selected" box in the file popup or it will export your entire blender scene with all pages in one piece (with my workflow, extra pages have the other LODs and collision and in progress working bits, so it's an enormous mess). ADDITIONALLY. IT ONLY SOMETIMES DOES NOT EXPORT THE UNSELECTED THINGS ANYWAY. This last go round, it would export around half of the rest of the stuff that had nothing to do with what I wanted to export, even though it wasn't selected! It was a consistent half, but it was not a helpful half.
So, time for making a copy of your blend file so you don't save over and lose everything. Open that in Blender 2.5. Delete everything on ALL the other pages. Delete everything you DO NOT NEED on the page with what you want to export. IF YOU ARE EXPORTING RIGGED MESH, DO NOT DELETE THE SKELETON. It needs that for the skeleton data. The body you're building around? All that can go, but not the skeleton itself. (And make sure it's the right skeleton if you've duplicated things for alternate working versions, of course.)
Last note: current version of the SL mesh uploader seems to require the collision object to have the same number of texture faces (and the same textures!) assigned as the LODs. Previous versions of the uploader did not, future versions may not again. There is no reason for collision to require textures assigned, and there is no helpful red error message, the button to calculate and upload just silently disables itself.
I primarily use Blender 2.49 (an old Jass build, that's long since not been available for download. It's comfortable for me, it predates Primstar, and it doesn't have some of the other glitches/intentional refusing to do what I want that was introduced that messed up my workflow). I haven't really jumped on the 2.5 bandwagon much yet, 2.49 does what I want, how I want it, and I haven't spent the time to find the way to work around 2.5 (just trying to cam around in it irks me with the new settings, and I haven't spent the time to get used to it or change it!)
Around half the time, exporting with the collada 1.4 exporter works just fine. The other half...it randomly divides out a few faces and assigns them to new texture space (the closest to tracking down any reason behind which faces it chooses I've come to is that sometimes, but only sometimes, when I merge edges, it glitches some of the faces to one side into a new texture space). This is NOT visible in Blender- it assigns texture faces just as you would expect, you only find out when uploading the collada and either the uploader fails because your models do not all have the same texture faces (or have too many- also note that you actually have to have all the _same_ textures assigned, not just the same number as well- or at least I do!), or you get it uploaded and find out you've got some straggler faces sprinkled around here and there that have a different texture face.
I've tried all sorts of ridiculous and time consuming experimentation with trying to track those down, fix them, replaced my collada exporting scripts with new versions, all to no avail. Finally I found one thing that actually fixed it: opening that blend file in Blender 2.5, and exporting in there.
BUT. The collada exporter in Blender 2.5 is twitchier. You MUST always make sure to tick the "export only selected" box in the file popup or it will export your entire blender scene with all pages in one piece (with my workflow, extra pages have the other LODs and collision and in progress working bits, so it's an enormous mess). ADDITIONALLY. IT ONLY SOMETIMES DOES NOT EXPORT THE UNSELECTED THINGS ANYWAY. This last go round, it would export around half of the rest of the stuff that had nothing to do with what I wanted to export, even though it wasn't selected! It was a consistent half, but it was not a helpful half.
So, time for making a copy of your blend file so you don't save over and lose everything. Open that in Blender 2.5. Delete everything on ALL the other pages. Delete everything you DO NOT NEED on the page with what you want to export. IF YOU ARE EXPORTING RIGGED MESH, DO NOT DELETE THE SKELETON. It needs that for the skeleton data. The body you're building around? All that can go, but not the skeleton itself. (And make sure it's the right skeleton if you've duplicated things for alternate working versions, of course.)
Last note: current version of the SL mesh uploader seems to require the collision object to have the same number of texture faces (and the same textures!) assigned as the LODs. Previous versions of the uploader did not, future versions may not again. There is no reason for collision to require textures assigned, and there is no helpful red error message, the button to calculate and upload just silently disables itself.
Wednesday, January 7, 2009
Decripple your build tools
I recommend skimming through Tentacolor if you're a huge geek, there are some amazingly awesome things in there.
One of which is how to decripple your build tools.
Disclaimer: the TOS is sort of murky on the legality of this maybe? I don't think that's what they intended with that clause and it's more towards don't copybot shit, but yeah, I feel I need to give the disclaimer. But hey, it's all in xml files, so it's EASY to edit, if they didn't want us doing it, there are other ways they could have approached that instead. Basically, read Jacek's disclaimer, because I can't be arsed to write a decent one.
Go to skins\default\xui\en-us and open up floater_tools.xml with a regular vanilla text editor (unless you like Dazzle Jazz Hands, in which case you want skins\silver\xui\en-us. I avoid it like the plague, so if things are done differently, you'll have to figure that out yourself). Head down to Position (meters), and in the next 3 declarations of code, change decimal_digits="3" to decimal_digits="5" (in my testing, 5 is the max amount SL keeps track of, you just get wiggly numbers you can't do anything with if you go higher). label="X" is doing it for the x, "Y" for y, "Z" for z, of course. Things are in the same order as the actual Build menu in here.
Do the same for Size (meters)! You can up Rotation as well, but 5's probably excessive for use there. You can also play around with the decimals in the rest of the declarations, as sometimes you can get more out of it (sometimes you can't).
The other SUPER DUPER AWESOME thing to do is fix your texture tab (which is talked about in this entry, this is all Jacek's smarts here). Transparency is capped in the editor...because the Lindens think we're idiots? I don't know. There's no reason not to make that puppy 100, so you can do full transparency in one click WITHOUT resorting to another texture.
Go to Transparency %, and bump max_val="90" to max_val="100"
I also up both the Repeats Per Face, max_val="100" to more than 100 too, because it's useful for Planar mapping (normal people have no need of this, but I've passed 100 repeats more than once. I haven't had to bump past 500...yet).
Unfortunately EVERY SINGLE TIME you have to update a viewer you have to go through this process again, which generally leads to me swearing, making due for a brief period, and then telling people I'm logging off to make my tools not awful (because you get used to them being awesome, and going back....sucks).
One of which is how to decripple your build tools.
Disclaimer: the TOS is sort of murky on the legality of this maybe? I don't think that's what they intended with that clause and it's more towards don't copybot shit, but yeah, I feel I need to give the disclaimer. But hey, it's all in xml files, so it's EASY to edit, if they didn't want us doing it, there are other ways they could have approached that instead. Basically, read Jacek's disclaimer, because I can't be arsed to write a decent one.
Go to skins\default\xui\en-us and open up floater_tools.xml with a regular vanilla text editor (unless you like Dazzle Jazz Hands, in which case you want skins\silver\xui\en-us. I avoid it like the plague, so if things are done differently, you'll have to figure that out yourself). Head down to Position (meters), and in the next 3 declarations of code, change decimal_digits="3" to decimal_digits="5" (in my testing, 5 is the max amount SL keeps track of, you just get wiggly numbers you can't do anything with if you go higher). label="X" is doing it for the x, "Y" for y, "Z" for z, of course. Things are in the same order as the actual Build menu in here.
Do the same for Size (meters)! You can up Rotation as well, but 5's probably excessive for use there. You can also play around with the decimals in the rest of the declarations, as sometimes you can get more out of it (sometimes you can't).
The other SUPER DUPER AWESOME thing to do is fix your texture tab (which is talked about in this entry, this is all Jacek's smarts here). Transparency is capped in the editor...because the Lindens think we're idiots? I don't know. There's no reason not to make that puppy 100, so you can do full transparency in one click WITHOUT resorting to another texture.
Go to Transparency %, and bump max_val="90" to max_val="100"
I also up both the Repeats Per Face, max_val="100" to more than 100 too, because it's useful for Planar mapping (normal people have no need of this, but I've passed 100 repeats more than once. I haven't had to bump past 500...yet).
Unfortunately EVERY SINGLE TIME you have to update a viewer you have to go through this process again, which generally leads to me swearing, making due for a brief period, and then telling people I'm logging off to make my tools not awful (because you get used to them being awesome, and going back....sucks).
Sunday, January 4, 2009
Adjustment Layers, yay! Also, a tad on Actions
Ever wanted to, say, change the Hue/Saturation on a bunch of layers without flattening? Or Levels? Or Curves? Or wanted to change any of those things but keep the original stuff uneditted in case you change your mind? Well then, my friend, Adjustment Layers are for you!
However, I'm a total tease, and FIRST I'm going to tell you about Actions. Actions are another way to apply the same adjustment to multiple layers. It doesn't stay edittable....but it can also do so much more!
Lights, Camera, Actions!
Actions are great when you have repetitive motions you need to go through. Say you need to go through a bunch of files, auto level them, hue/sat them to the exact same value, rotate them 90 degrees clockwise, and resize them to exactly the same size. Actions can try to save our poor carpal tunnely wrists by doing this in one bing bang boom click, once we've done the first one. Actions can record any repeated motion with exactly the same settings, and save that to be applied with one click, regardless of how many steps, at any time.
Firstly here, I'm going to assume throughout this (and, really, all my other) rambling, that your window setup is like mine. There's no real reason for this assumption, other than I think I pretty much keep the default, and you may have to.
You see on the probably right side of your screen (your right, not its right....ok, so I don't think I've mentioned this, but I have a really hard telling my left from my right. So if it's not there, look at the other right, ok?) there are these windows. One of them, possibly the bottom, is where you do your layering magic. But anyway, each of them have these tabs at the top with other options. Right now, I want you to find the one that says History. It should have another tab that says Actions.
If you can't find it, pull down the Windows menu, and choose Actions. If it has a checkmark next to it it's already center stage- if not and you click it, it becomes active, and pops out if you don't have it up already.
There are a couple of folders- Default Actions, possibly Textures. Make a new one, name it "Mine" or "Tralala I can't hear you" or what so ever you please. This is where you will keep your actions so you can find them.
Take your first file, or layer, that you will be applying all these same things to, and make it active. Create a new action in this folder with the same new icon you should be familiar with with Layers. Name it something you can remember, and hit "Record".
Now, do your stuff! Remember, Actions are reeeeeally dumb. They can do exactly the same thing, nothing else. However, they're also kind of smart, you can set your resizing to width by pixels, or percentage, or whatever, and it defines by what it sees set (so you can always scale by 50%, or always 512 wide, or set both height and width to pixels)- it also can apply identical filter settings, or adjustment settings, or pretty much anything really.
Once you're done, hit the stop button, that looks like an old timey cassette tape player stop button. (It's the box.) Now, go to whatever you want to do just like you did....and hit the play button (the filled in arrow), with that Action selected. Sit back and oooooh and aaaaaah over the magic!
You can see everything your action is doing by expanding the arrow next to it, it will show each step with a checkmark next to it. You can toggle steps on and off with these checkmarks, and some expand further to see their settings, what it will apply when the Action is played. Actions will play from the one selected down, if you select one in the middle, skipping the first steps.
Actions are useful in some cases, useless in others. They may or may not be something you want to use. But keep them in mind, for they can save you a lot of hastle, time, and typing, when you do have things you can automate.
But! To get back on the train of thought that got toooootally disrailed there, plowed through a pasture with some cute bunnies, hopped on other tracks and went around a few circles, and finally is reconnecting with what we came here for: Adjustment Layers!
How I Learned to Stop Worrying, and Love the Adjustment Layers
Sorry about that. I get distracted by shiny things, and oh! hey! that's kinda useful crap too! My brain, she is kind of a cluttered mess.
Adjustment Layers are pretty damn superduperawesomefunsauce. They've got a lot of great advantages:
1) They are non destructive. Your original layers are still intact and full of every last drop of juicy information they started with.
2) They are infinitely adjustable. You can go in and tweak that red value 2 degrees up more if you want, you can do a rough "oh, I'll shove everything in that general dirction" and go back and do settings for reals later.
3) They apply to EVERYTHING below them. All layers, without flattening or doing each by hand.
4) They can have masks. You should have learned in our last installment how damn jibbing awesome masks are. This will make you love masks more.
And probably many more, but, eh, that'll do for the sales pitch for now. Once you've used them, you too will squee with delight.
Now, to do: Look to your Layers palette. There are a bunch of wacky icons at the bottom. Mine are chain, squiggly f in a circle, box with a hole in it, circle that's half black/half white diagonally, folder, folded up page, trashcan. In real world terms that translates to:
Link (chain), which links layers so when you move one, you move all, and such things;
Layer Style (f in a circle), which lets you do fancy smacktacular things like drop shadows the easy way, none of this making a selection, filling it with black on a new layer underneath, and blurring it until it looks good like the old days;
Mask (box with a hole), which should you should somewhat understand from our previous installment;
Fill or Adjustment Layer (half black/half white circle, diagonally), which is what we want!;
and New Folder, for putting layers in folders; New Layer, which you should be well versed with; Trash, which you should also be well versed with.
Pull down your half black/half white circle. Pick the type of adjustment, like, say, Hue/Saturation. The normal Hue/Sat thing pops up, move your sliders. Every layer under what you've got selected, including what you've got selected, goes what you choose, like magic! You've got a layer now that's got a wacky sort of control panelly thing instead of a drawing box as its icon, with a drawing box full of white next to it.
If you want to hue shift everything there, we're done. If not though, we have options for applying this selectively. If you want to change your selection by masking, turn to Page 3. If you want to have your adjustment layer apply to cutouts and not a background, turn to Page 5.
Page 3 - Masking for Fun and Profit
You have chosen to play with masking! Masking is a highly rewarding way of dealing with your adjustment layer. You can do things like apply a black to white gradient on your mask to fade the change, or guassian blur selections, make selections off of other layers, or draw what you want directly on your layer. White will show the effect. Black will hide the effect. Draw right on your layer with black and white to change how the effect deals with the layers below it. You can, for instance, make an adjustment layer for shading on clothing, delete it all so it's black, and draw on it with white for the shadows, and this will apply your adjustments. You can easily shade patterns! You can change base layers instead of hue layers on top to change colours of things! And, best of all, you can go back and tweak your shading at any time without messing up your original image- those of you who dodge and burn shade may find that you can get the same effect with adjustment layers without having to start all over when the cat hops up and knocks your mouse arm!
In short: anything you can do to a regular layer, pretty much, can be done to an adjustment layer mask. It will be done entirely in greyscale, and the amount of white in the pixels will determine how much the adjustment shows. Adjustment Layer masks are exactly like layer masks, folder masks, and channels.
For the end blabbering that doesn't really make any difference, turn to Page 8.
Page 5 - You Mean You Kept the Easy Way for Last?
You have chosen the easy way, when you have cutouts! You're smarter than I am, you know, I ALWAYS forget this, and end up selecting and knocking out my selections in the mask the hard way instead.
Put all of the cutouts (basically, but this I mean "anything that isn't a full layer that covers the background and has an alpha") that you want your adjustment layer to apply to in a new folder. You get that with the Folder icon, as if you didn't know already. Now, place (or create) your adjustment layer on top of all of the layers. Still applying to the Background, and you don't want that. But, with one little tiny click...
And that tiny click is you at the top of our Layers palette, there's a dropdown that says "Pass Through". You probably already know about layer modes- if not, they're reeeeally fun. Overlay for highlight layers, for instance. Multiply when you want to make the darks pop. But I digress. Change that from "Pass Through" to "Normal", and now your adjustment layer only applies to things that are "solid"! Magically your background is now happy and free of your adjustment layer, since it isn't in the folder.
For the end blabbering that doesn't really make any difference, turn to Page 8.
Page 8 - The Mostly Unnecessary Conclusion, in which I Blabber Randomly
You're actually going to be happy I didn't illustrate this tutorial at this time. 1) It would have taken me way way longer to do, 2) I would have been illustrating everything with a really badly drawn cartoon of a mantis, and it would have been really bad as I am a totally incapable of using a tablet, as I thought through a lot of this last night as I was trying (and failing) to sleep, as my brain that makes sense decided to try to get a nap, and the other brain that suffers from really bad insomnia makes no sense, ever. Like, WHEEEEEEEEEEEEEEEEE! I'M NAKED! GIMME A CUPCAKE!, but worse. It sometimes involves imaginary critters and going over the same phrases of nonsense over and over like they are the most profound things in the whole wide world.
But anyway. That's adjustment layers! This has only passed on the very slightest and tiniest bit of how awesome they are. This should give you enough of an introduction to find out some of that on your own as you experiment and play with all the amazing things you can do, and enough choice words to drop in a google search for a real proper tutorial, which is how I learn 90% of the stuff I know how to do in Photoshop. Dear Google, I love you. Even when perfectly innocuous search terms drop me into yaoi websites. Or, wait, did I mean especially when?
However, I'm a total tease, and FIRST I'm going to tell you about Actions. Actions are another way to apply the same adjustment to multiple layers. It doesn't stay edittable....but it can also do so much more!
Lights, Camera, Actions!
Actions are great when you have repetitive motions you need to go through. Say you need to go through a bunch of files, auto level them, hue/sat them to the exact same value, rotate them 90 degrees clockwise, and resize them to exactly the same size. Actions can try to save our poor carpal tunnely wrists by doing this in one bing bang boom click, once we've done the first one. Actions can record any repeated motion with exactly the same settings, and save that to be applied with one click, regardless of how many steps, at any time.
Firstly here, I'm going to assume throughout this (and, really, all my other) rambling, that your window setup is like mine. There's no real reason for this assumption, other than I think I pretty much keep the default, and you may have to.
You see on the probably right side of your screen (your right, not its right....ok, so I don't think I've mentioned this, but I have a really hard telling my left from my right. So if it's not there, look at the other right, ok?) there are these windows. One of them, possibly the bottom, is where you do your layering magic
If you can't find it, pull down the Windows menu, and choose Actions. If it has a checkmark next to it it's already center stage- if not and you click it, it becomes active, and pops out if you don't have it up already.
There are a couple of folders- Default Actions, possibly Textures. Make a new one, name it "Mine" or "Tralala I can't hear you" or what so ever you please. This is where you will keep your actions so you can find them.
Take your first file, or layer, that you will be applying all these same things to, and make it active. Create a new action in this folder with the same new icon you should be familiar with with Layers. Name it something you can remember, and hit "Record".
Now, do your stuff! Remember, Actions are reeeeeally dumb. They can do exactly the same thing, nothing else. However, they're also kind of smart, you can set your resizing to width by pixels, or percentage, or whatever, and it defines by what it sees set (so you can always scale by 50%, or always 512 wide, or set both height and width to pixels)- it also can apply identical filter settings, or adjustment settings, or pretty much anything really.
Once you're done, hit the stop button, that looks like an old timey cassette tape player stop button. (It's the box.) Now, go to whatever you want to do just like you did....and hit the play button (the filled in arrow), with that Action selected. Sit back and oooooh and aaaaaah over the magic!
You can see everything your action is doing by expanding the arrow next to it, it will show each step with a checkmark next to it. You can toggle steps on and off with these checkmarks, and some expand further to see their settings, what it will apply when the Action is played. Actions will play from the one selected down, if you select one in the middle, skipping the first steps.
Actions are useful in some cases, useless in others. They may or may not be something you want to use. But keep them in mind, for they can save you a lot of hastle, time, and typing, when you do have things you can automate.
But! To get back on the train of thought that got toooootally disrailed there, plowed through a pasture with some cute bunnies, hopped on other tracks and went around a few circles, and finally is reconnecting with what we came here for: Adjustment Layers!
How I Learned to Stop Worrying, and Love the Adjustment Layers
Sorry about that. I get distracted by shiny things, and oh! hey! that's kinda useful crap too! My brain, she is kind of a cluttered mess.
Adjustment Layers are pretty damn superduperawesomefunsauce. They've got a lot of great advantages:
1) They are non destructive. Your original layers are still intact and full of every last drop of juicy information they started with.
2) They are infinitely adjustable. You can go in and tweak that red value 2 degrees up more if you want, you can do a rough "oh, I'll shove everything in that general dirction" and go back and do settings for reals later.
3) They apply to EVERYTHING below them. All layers, without flattening or doing each by hand.
4) They can have masks. You should have learned in our last installment how damn jibbing awesome masks are. This will make you love masks more.
And probably many more, but, eh, that'll do for the sales pitch for now. Once you've used them, you too will squee with delight.
Now, to do: Look to your Layers palette. There are a bunch of wacky icons at the bottom. Mine are chain, squiggly f in a circle, box with a hole in it, circle that's half black/half white diagonally, folder, folded up page, trashcan. In real world terms that translates to:
Link (chain), which links layers so when you move one, you move all, and such things;
Layer Style (f in a circle), which lets you do fancy smacktacular things like drop shadows the easy way, none of this making a selection, filling it with black on a new layer underneath, and blurring it until it looks good like the old days;
Mask (box with a hole), which should you should somewhat understand from our previous installment;
Fill or Adjustment Layer (half black/half white circle, diagonally), which is what we want!;
and New Folder, for putting layers in folders; New Layer, which you should be well versed with; Trash, which you should also be well versed with.
Pull down your half black/half white circle. Pick the type of adjustment, like, say, Hue/Saturation. The normal Hue/Sat thing pops up, move your sliders. Every layer under what you've got selected, including what you've got selected, goes what you choose, like magic! You've got a layer now that's got a wacky sort of control panelly thing instead of a drawing box as its icon, with a drawing box full of white next to it.
If you want to hue shift everything there, we're done. If not though, we have options for applying this selectively. If you want to change your selection by masking, turn to Page 3. If you want to have your adjustment layer apply to cutouts and not a background, turn to Page 5.
Page 3 - Masking for Fun and Profit
You have chosen to play with masking! Masking is a highly rewarding way of dealing with your adjustment layer. You can do things like apply a black to white gradient on your mask to fade the change, or guassian blur selections, make selections off of other layers, or draw what you want directly on your layer. White will show the effect. Black will hide the effect. Draw right on your layer with black and white to change how the effect deals with the layers below it. You can, for instance, make an adjustment layer for shading on clothing, delete it all so it's black, and draw on it with white for the shadows, and this will apply your adjustments. You can easily shade patterns! You can change base layers instead of hue layers on top to change colours of things! And, best of all, you can go back and tweak your shading at any time without messing up your original image- those of you who dodge and burn shade may find that you can get the same effect with adjustment layers without having to start all over when the cat hops up and knocks your mouse arm!
In short: anything you can do to a regular layer, pretty much, can be done to an adjustment layer mask. It will be done entirely in greyscale, and the amount of white in the pixels will determine how much the adjustment shows. Adjustment Layer masks are exactly like layer masks, folder masks, and channels.
For the end blabbering that doesn't really make any difference, turn to Page 8.
Page 5 - You Mean You Kept the Easy Way for Last?
You have chosen the easy way, when you have cutouts! You're smarter than I am, you know, I ALWAYS forget this, and end up selecting and knocking out my selections in the mask the hard way instead.
Put all of the cutouts (basically, but this I mean "anything that isn't a full layer that covers the background and has an alpha") that you want your adjustment layer to apply to in a new folder. You get that with the Folder icon, as if you didn't know already. Now, place (or create) your adjustment layer on top of all of the layers. Still applying to the Background, and you don't want that. But, with one little tiny click...
And that tiny click is you at the top of our Layers palette, there's a dropdown that says "Pass Through". You probably already know about layer modes- if not, they're reeeeally fun. Overlay for highlight layers, for instance. Multiply when you want to make the darks pop. But I digress. Change that from "Pass Through" to "Normal", and now your adjustment layer only applies to things that are "solid"! Magically your background is now happy and free of your adjustment layer, since it isn't in the folder.
For the end blabbering that doesn't really make any difference, turn to Page 8.
Page 8 - The Mostly Unnecessary Conclusion, in which I Blabber Randomly
You're actually going to be happy I didn't illustrate this tutorial at this time. 1) It would have taken me way way longer to do, 2) I would have been illustrating everything with a really badly drawn cartoon of a mantis, and it would have been really bad as I am a totally incapable of using a tablet, as I thought through a lot of this last night as I was trying (and failing) to sleep, as my brain that makes sense decided to try to get a nap, and the other brain that suffers from really bad insomnia makes no sense, ever. Like, WHEEEEEEEEEEEEEEEEE! I'M NAKED! GIMME A CUPCAKE!, but worse. It sometimes involves imaginary critters and going over the same phrases of nonsense over and over like they are the most profound things in the whole wide world.
But anyway. That's adjustment layers! This has only passed on the very slightest and tiniest bit of how awesome they are. This should give you enough of an introduction to find out some of that on your own as you experiment and play with all the amazing things you can do, and enough choice words to drop in a google search for a real proper tutorial, which is how I learn 90% of the stuff I know how to do in Photoshop. Dear Google, I love you. Even when perfectly innocuous search terms drop me into yaoi websites. Or, wait, did I mean especially when?
Monday, December 8, 2008
A treatise on image formats
A few unrelated things lately have led to this. Now, a lot of you already know this, so please do skip over and ignore, but people from SL come from all sorts of backgrounds, so this is new (and rather important, if I do say so myself) information to some, as they aren't versed in such.
There are a large number of image formats available to us today. Some are more suited to certain applications than others. I come from a webnerd background, to a degree, so that's where some of my bent comes from, and I've been around long enough I've seen a few of these formats come to popularity. Now, you'll have to bear with me being opinionated and the memory of my failing brain, so some of the history here may not be entirely accurate. I'm old, dagnabbit.1 I'm also almost entirely self taught, so this is all stuff I randomly picked up here and there- and to add on, I'm going to gloss over some of the more accurate seriously technical bits and try to translate it into something that is, I hope, easier to understand, although possibly less technically accurate.
In brief: JPEG bad. BMP pointless and stupid. PNG awesome except for transparencies. Yay TGA!
I'm also going to do a bit of a runthrough of how _I_ do alphas with TGAs, at the bottom. This applies to Photoshop CS2, your mileage may vary when using any other version.
The JPEG and You
Ah, the ubiquitous JPEG. I've never really liked you, you know. Not even when you were the only viable game in town2 when it came to full colour- even though the poor little GIF was limited to 256, I always liked him better. (Note: I'm not going to cover the GIF. GIFs are lovely for small and portable oldskool pixel images with either/or transparency. They're pretty much useless when it comes to the sort of things you'll be doing in SL.)
You see, Mr. JPEG, you're a lossy format (lossy = oh, I can lose some of the information here and it won't really matter! No one will notice! Except when they will!). I really don't like it when someone decides that, oh, only parts of my image are important, let's just divide it into chunks, and make guesses about what the contents of the chunks are. I like all of my pixels equally, they are all my dearest darling wonderful children of light, and I am rather offended you think that it's "good enough" to just get kind of close.
In the land before the time of the PNG (oh, my favourite dearest for everything but SL, you magic format you), JPEG was really the option we had if we wanted to not have things be friggin' huge, and if we wanted to actually, you know, be able to load them. It's good for images with a lot of information in which not all of it is pixel specific- like photographs. Our eyes throw out a lot of that info anyway, since there's so much noise and variation. BUT, and here's the problem- JPEGs throw out MORE information. They use this funky algorythm that looks at chunks of pixels, and then instead of saving what each one is, it builds something that it is more efficient (at the time, as we're talking the deep dark ages here) than saving each pixel individually. But....if you ever save a JPEG a second time, it does that AGAIN, and it gets less acurate, each time. Plus, that slider of compression? Tells it the size chunks, the accuracy of guessing, and the more compression, the more assy your picture will be. This causes worse artifacting- you know when you look close and you can see those square muddy areas that aren't quite right?
Basically, AVOID AVOID AVOID. You do not EVER want to use JPEGs with SL. EVER. Trust me. There are better formats (and due to SL's recompression, the file size isn't even a deal). Also, in anything you do, NEVER use JPEGs for working copies. Save things you'll be working with again as any lossless format instead, because you lose information every time you save a JPEG, until you start seeing the mush, and that's crap.
If you're making sculpts, and you save your sculpt maps as a JPEG...You're fucked. 100% double fucked. Your sculpt map turns to jelly, because those actually need pixels to be WHAT THEY ARE, not just a half decent guess with a blindfold on. If you've got some severe lumpy mesh deformation going on, this could be your problem. Make sure no exporter or anything along the way uses JPEG.
Plus, SL uses JPEG itself. It recompresses everything you upload into JPEG2000 (which is a fancy smacktacular JPEG format that does more stuff, but is still a pissy little bastard and I hates him), so your artifacting gets worse due to the multiple save rule. Bright side? Your hugeass TGA file is a managable size and can actually be loaded by people's computers faster, and that's why they use it. Even though I'm still kind of against it. I told you I was opinionated!
The Mighty BMP, or Mommy, Why Is My File So Huge?
BMPs (Bitmaps, should you ever be at a dinner party and feel the need to show off that you are a GREAT HUGE NERD) are a really old skool format. They are lossless, so they fit my "use a lossless format" criteria. They're an old Windoze format that lets you save what you actually want (PICTs were the Mac equivalent, as they wanted to do something different, read: more efficient. Once upon a time it wasn't always easy to open PICTs on Windows, but I never had problems with BMPs on Macs. This is all ancient history, and feel free to completely ignore the old lady nattering on about her childhood and walking uphill to school, both ways, in the snow).
The downside though? Dear mother of god that's a big file. SL used to save your screenshots as BMPs, and you had no say in the matter. Which is why your harddrive filled up by leaps and bounds if you took snaps, because it's a horribly inefficient format, and we live in the modern age of miracles and flying cars, and have better options now. The newer SL viewers allow you to save your snapshots as PNGs. Do that, and be happy, as you don't take one snapshot and have your terabyte drive going "oh hai, I gots no more space."
Basically, we've another example of AVOID AVOID AVOID. Not because you're fucking yourself over with the actual image, but because there are better ways to do things now, and we don't need to bother with this jackassery anymore.
The PNG Comes to Save the Day. Sort of.
Once upon a time, there was this new up and coming format, the mysterious PNG. It was going to be magical and mystical, and let you put images in webpages that had more than 256 colours, but also were lossless and crisp and beautiful. What's more, this magical fairyland format was going to let you do transparency, which JPEG did not, and, oh!, you could also do gradual transparency so it wasn't just one colour set to clear, but you could have gradients and fades and it was all wonderful and beautiful and we lived hapily ever after.
And, of course, while this was a format targetted towards the web, Internet Explorer dragged its feet on implementing it properly, taking years and years to implement the transparency on the PC, while the Mac, and Netscape, had it wonderfully. Yes, I'm talking about Netscape, back when they actually updated it regularly, when it was the viewer of choice for most people. I told you, I'M OLD.
PNG is my format of choice when saving snapshots, it's lovely and portable, and it loves each and every pixel as all of its beautiful and perfect children, and wouldn't dream of forgetting one. I used to batch my screens as PNGs and trash the BMPs, to make space. It's as crisp as BMP, and your screen as you're seeing things, but it's smaller file size and takes a lot more to fill up your harddrive.
In short, it's perfect. All of the advantages, none of the disadvantages.
Oh, wait. That's not entirely true. There are disadvantages for content creators: the white halo of dOOOOOOOOOOm.
When it comes to making textures, PNGs are not quite as perfect as you would hope.
If you are making textures with no alpha, you're golden. Now, if you're making those textures in PS, you want to make sure they are REALLY without alpha, due to the dreaded alpha flicker- so make sure your PNG is totally and entirely flattened before saving, and says Background, not Layer 03, in the layers palette. Layer 0 gives you an alpha channel you aren't using- so it all looks nice and lovely, but you get it in SL and put a texture with alpha in front of it and cam around...and oh crap. Our z sorting issue is the price we pay for features like light, so we put up with it....for now. Even though it can bite my shiny metal ass.
The problem with PNGs, see, is that any pixel that's fully alpha, doesn't exist in colourspace. And because we read things at multiple resolutions with SL, and the way that it deals with the transparency (I'm going with "it's all JPEG2000's fault"4, although I sort of mostly ignored that format because it did a lot of floundering and dying in the areas in which I was interested....it was totally someone's pet nerd project, to use JPEG2000. One of the devs fell in love with the format and convinced everyone else he was right), the dead space gets SEEN. And dead space = white. So you get white edges, because SL divides the image up into "pretty colours" and "this is what we see" and loads them separately.
(Note: That Interlaced or none prompt? Is a loading order thing5. It means nothing to you, since SL makes them JPEG2000. I always leave it on none.)
Oh, Wait, You Mean You Want Me to Use a Real Game Format, Mr. TGA?
Our workaround here, is the TGA. Now, TGAs have disadvantages: namely, like BMPs, they are inefficient in their lossless compresion. TGAs are an actual proper format used in game design for real things, and it's got all sorts of extras that BMPs don't, and that's part of why it has the file bloat- even if you aren't using it, it sort of leaves the door open and decides that it needs to keep track of it all anyway.
I didn't say it was really the most brightest crayon in the box. Just that it was what worked the best!
I save ALL of my textures as TGAs, regardless of whether they have an alpha channel or not. It's easier for me than flipping back and forth to PNG, but that's a decision I leave up to you. Things with alpha channels should be TGAs though, period.
You see, TGAs save the dead space! They do alpha channels separately. This can make them more of a pain to work with, if you're used to the PNG way of just leaving areas you don't want seen with nothing on them. Because, see, with TGAs, your entire image is filled, and flat, and you don't see the transparency at all. And in the next section....we'll talk about the solution to adding your transparency. Look, really useful stuff finally!
Masks, Channels, Alphas, and How to Make It Not a Filled Up Square
TGAs are so useful because the alphas are separate from the image. You paint outside the lines on the image proper, but you make the lines somewhere else. If you're unfamilar with this way of working, it might be a bit of a challenge adjusting how you do things to make it work. I'm not going to tell you the way to do that, you're going to have to find out what works for you, as everyone finds a different way to do things. (After all, they're sort of endless!)
Now, technically, this applies to CS2. It MAY apply to other versions, however, I make no guarantees.
Do you know about Masks? Masks are lovely. If you have every used an adjustment layer, you see that black and white box, where the white areas get the adjustment layer applied, and the blacks don't? That's a Mask. Basically, a Mask is a separate alpha channel you can apply to any layer or folder, it's a little black and white box that pops up next to your layer (or folder), that lets you draw on it in greyscale. White = visible, black = invisible, and the greys in between are the gradient along the way to give you pretty edges and not make things pixelated. To add a mask to any layer, select that layer and hit the square with the circle in the middle in the bottom of the layers tab. When you have a mask and a layer, the one actively selected will have a dotted box around it in the layers tab, so you know which one you're drawing on.
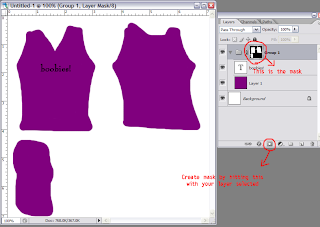
Yes, a drunken monkey drew this. Obviously, this is not what it should REALLY look like.
Now, to see your transparency in this brave new world of TGA, so things look like what's you're used to, make a folder, put evvvvvvverything in that folder, all your layers, and make new layers as you go in this folder, and make your mask on _that_ folder. Now, everything that gets seen, gets seen! And everything that doesn't, doesn't! It looks just like when you were doing PNGs! (Even if it means you have to _do_ it differently.)
When you turn that mask off, by holding Shift and clicking on it, you should see all the spaces outside the lines. Which should be very similar to the pixels next to them, that are seen. I leave it to you to decide how this is done. Fill a background layer behind it all with a colour that fits? Smudge an underlayer out? Draw all over the dead space in the first place and make things keep going? (This last one is my way, but I also come from a different graphic background....so I was doing it anyway.)
To make your mask, you have a few options. You can select a layer, or just make any selection, and either make your mask while that selection is active and it will apply it, or fill the mask with white (or black, if you want it invisible) in the selection (delete with your choice as the background colour, as a real fill may screw you over). You can also take your paintbrush and draw your mask right there as you go, using white to reveal areas, black to conceal. You can also use vector masks, which let you use Paths (PS's gimpy vector tools) to make hard edged selections that remain edittable. (Note: If you are interested in this, look up PS tutorials on Paths and Vector Masks for the techniques, I'm not going into it here. Its usefulness entirely depends on how you want to do things- it can be useful, or it can be extraneous and something you'll never want.)
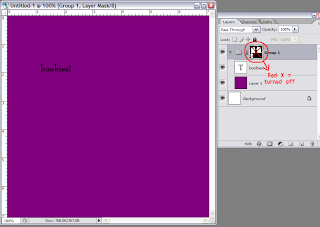
Now, once you're done, and you've got your image that spreds out beyond the invisible edges, and your lovely alpha mask....Turn that alpha mask off. Hold Shift, and click on it, and boom! your lovely selection goes away. Now, select your alpha mask (ctrl+click on mask), and go to the Channels tab. It should be in the window with Layers, it should say "Layers", "Channels", and "Paths" for the tabs at the top. Make a new channel, the same way you make a new layer, and fill that with white by deleting, or hitting invert, or whatnot.
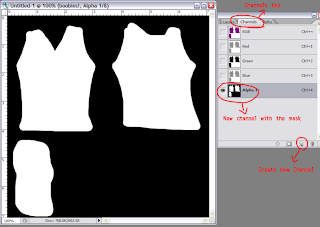
Now. DUPLICATE YOUR IMAGE. Trust me. You don't want to lose everything when you flatten it and accidentally save instead of save as. And you DO want to keep a layered backup, I'm sure you know by now!
Now, flatten your image. With the mask inactive, so it's all that messy outside the lines, and you have no lovely alpha....OR DO YOU? Because, see, you've got it in your channel!
Save your image as a tga. Make sure Alpha Channels is ticked on (and As a Copy isn't), then, it will prompt you:
16 bits/pixel
24 bits/pixel
32 bits/pixel
Ignore 16, forever and always, it means nothing to you. CHOOSE 32. If you have an alpha channel, you NEED 32. On the other hand....if you don't have an alpha channel, to get away from the dreaded flicker, you NEED 246. That says "oh hey, no alphas for us, nevermind!" instead of "I have an alpha channel even though it doesn't look like it, I just choose to make everything visible, so I can fuck with everything with transparency around me." Those extra 8 bits ARE the alpha, if it has that many, it has an alpha, period (and, as an added oh hey PS hates us bonus, if you don't have Alpha Channels ticked on in the save as dialog...it trashes your alpha channel and puts in a pure white one if you save as 32). If it doesn't have them, no alpha, regardless of your masking. You can open that file up again to look at it, and see if there is an extra channel there. (Remember, there will ALWAYS be 4 layers in there, for full view, red, green, and blue. The colour separations are awesome if you get into some wacky sculpting stuff- but generally not so useful with regular textures.)
Other uses for channels: you can cntl+click a channel and it will load that selection. If you have a selection you want to keep? Hey there sailor! There are also certain filters that can be used in conjunction with channels for whizbang effects. Now, you MUST make sure to delete all extraneous channels before you do your saving, since you don't want it to get confused!
For a last somewhat helpful note: if you're making clothing, save your image as 512x512, always. I make them double size, but my last step is scaling down. Why? Because SL will scale to 512x512 for you, regardless of what you want. That IS the resolution the avatar textures will be, period (and you gain nothing but crappy jagged edges if you go smaller). There is no way to squeeze more out, and this way you aren't making SL do another step of work, so things load better, faster, stronger. I work larger because I can play around with more detail and have more fine control.
1Ok, I'm not really THAT old. But I might be older than you. I remember the day before you young whippersnappers and your css, when we had to do all our formatting in HTML and tables, and we liked it.
2There was the BMP and PICT, of course, but I'm coming from a webnerd background here, and those were not viable options. Plus, I'll be getting to the BMP later.
3The thing you have to understand about computers, is that they're sort of dumb. They can't figure out there's no alpha unless you tell it repeatedly7. Flattening to Background is how you tell a PNG that no, really, FOR SURE, you didn't mean to have an alpha channel. Honestly. For reals. Trust me. No, really, PNG, I'm serious.
4In reality it's probably Photoshop's fault, with the way it does PNG alphas- since there AREN'T any pixels there in the first place, so it has to make shit up, and white is the colour of imaginary angel pixels, or something. However, I would really rather blame it on JPEG2000, because I keep grudges. Also, because of the way SL works, you get to see those imaginary pixels, so THERE, that IS JPEG2000's fault. Neener.
5Interlaced is kind of nifty for the web, back in the day when we were all on dialup and things went slooooooow. It would load the image in "stripes" kind of, instead of top down, so you would sort of see the image, and it would get clearer as it loaded. Kind of. Again, ignore.
6Again, see "computers are dumb". Because really, TGA, even though I told you once before already, I REALLY TRULY want an alpha channel if it's 32 bit7. And I REALLY DON'T if it's 24 bit. Also, if you save a TGA with a channel at 24 bit? Your channel GOES POOF. So make sure you save as the right bits! Also, this is another reason we make a duplicate of the image!
7There are, of course, limited cases in which you WANT an apparently solid image to actually have a transparency channel- if you're doing something fancy with invisiprims (like the flea with the magnifying glass), things that "look" solid will become invisible, and in limited cases, it's quite a clever effect. Just...not so awesome, unintentionally.
There are a large number of image formats available to us today. Some are more suited to certain applications than others. I come from a webnerd background, to a degree, so that's where some of my bent comes from, and I've been around long enough I've seen a few of these formats come to popularity. Now, you'll have to bear with me being opinionated and the memory of my failing brain, so some of the history here may not be entirely accurate. I'm old, dagnabbit.1 I'm also almost entirely self taught, so this is all stuff I randomly picked up here and there- and to add on, I'm going to gloss over some of the more accurate seriously technical bits and try to translate it into something that is, I hope, easier to understand, although possibly less technically accurate.
In brief: JPEG bad. BMP pointless and stupid. PNG awesome except for transparencies. Yay TGA!
I'm also going to do a bit of a runthrough of how _I_ do alphas with TGAs, at the bottom. This applies to Photoshop CS2, your mileage may vary when using any other version.
The JPEG and You
Ah, the ubiquitous JPEG. I've never really liked you, you know. Not even when you were the only viable game in town2 when it came to full colour- even though the poor little GIF was limited to 256, I always liked him better. (Note: I'm not going to cover the GIF. GIFs are lovely for small and portable oldskool pixel images with either/or transparency. They're pretty much useless when it comes to the sort of things you'll be doing in SL.)
You see, Mr. JPEG, you're a lossy format (lossy = oh, I can lose some of the information here and it won't really matter! No one will notice! Except when they will!). I really don't like it when someone decides that, oh, only parts of my image are important, let's just divide it into chunks, and make guesses about what the contents of the chunks are. I like all of my pixels equally, they are all my dearest darling wonderful children of light, and I am rather offended you think that it's "good enough" to just get kind of close.
In the land before the time of the PNG (oh, my favourite dearest for everything but SL, you magic format you), JPEG was really the option we had if we wanted to not have things be friggin' huge, and if we wanted to actually, you know, be able to load them. It's good for images with a lot of information in which not all of it is pixel specific- like photographs. Our eyes throw out a lot of that info anyway, since there's so much noise and variation. BUT, and here's the problem- JPEGs throw out MORE information. They use this funky algorythm that looks at chunks of pixels, and then instead of saving what each one is, it builds something that it is more efficient (at the time, as we're talking the deep dark ages here) than saving each pixel individually. But....if you ever save a JPEG a second time, it does that AGAIN, and it gets less acurate, each time. Plus, that slider of compression? Tells it the size chunks, the accuracy of guessing, and the more compression, the more assy your picture will be. This causes worse artifacting- you know when you look close and you can see those square muddy areas that aren't quite right?
Basically, AVOID AVOID AVOID. You do not EVER want to use JPEGs with SL. EVER. Trust me. There are better formats (and due to SL's recompression, the file size isn't even a deal). Also, in anything you do, NEVER use JPEGs for working copies. Save things you'll be working with again as any lossless format instead, because you lose information every time you save a JPEG, until you start seeing the mush, and that's crap.
If you're making sculpts, and you save your sculpt maps as a JPEG...You're fucked. 100% double fucked. Your sculpt map turns to jelly, because those actually need pixels to be WHAT THEY ARE, not just a half decent guess with a blindfold on. If you've got some severe lumpy mesh deformation going on, this could be your problem. Make sure no exporter or anything along the way uses JPEG.
Plus, SL uses JPEG itself. It recompresses everything you upload into JPEG2000 (which is a fancy smacktacular JPEG format that does more stuff, but is still a pissy little bastard and I hates him), so your artifacting gets worse due to the multiple save rule. Bright side? Your hugeass TGA file is a managable size and can actually be loaded by people's computers faster, and that's why they use it. Even though I'm still kind of against it. I told you I was opinionated!
The Mighty BMP, or Mommy, Why Is My File So Huge?
BMPs (Bitmaps, should you ever be at a dinner party and feel the need to show off that you are a GREAT HUGE NERD) are a really old skool format. They are lossless, so they fit my "use a lossless format" criteria. They're an old Windoze format that lets you save what you actually want (PICTs were the Mac equivalent, as they wanted to do something different, read: more efficient. Once upon a time it wasn't always easy to open PICTs on Windows, but I never had problems with BMPs on Macs. This is all ancient history, and feel free to completely ignore the old lady nattering on about her childhood and walking uphill to school, both ways, in the snow).
The downside though? Dear mother of god that's a big file. SL used to save your screenshots as BMPs, and you had no say in the matter. Which is why your harddrive filled up by leaps and bounds if you took snaps, because it's a horribly inefficient format, and we live in the modern age of miracles and flying cars, and have better options now. The newer SL viewers allow you to save your snapshots as PNGs. Do that, and be happy, as you don't take one snapshot and have your terabyte drive going "oh hai, I gots no more space."
Basically, we've another example of AVOID AVOID AVOID. Not because you're fucking yourself over with the actual image, but because there are better ways to do things now, and we don't need to bother with this jackassery anymore.
The PNG Comes to Save the Day. Sort of.
Once upon a time, there was this new up and coming format, the mysterious PNG. It was going to be magical and mystical, and let you put images in webpages that had more than 256 colours, but also were lossless and crisp and beautiful. What's more, this magical fairyland format was going to let you do transparency, which JPEG did not, and, oh!, you could also do gradual transparency so it wasn't just one colour set to clear, but you could have gradients and fades and it was all wonderful and beautiful and we lived hapily ever after.
And, of course, while this was a format targetted towards the web, Internet Explorer dragged its feet on implementing it properly, taking years and years to implement the transparency on the PC, while the Mac, and Netscape, had it wonderfully. Yes, I'm talking about Netscape, back when they actually updated it regularly, when it was the viewer of choice for most people. I told you, I'M OLD.
PNG is my format of choice when saving snapshots, it's lovely and portable, and it loves each and every pixel as all of its beautiful and perfect children, and wouldn't dream of forgetting one. I used to batch my screens as PNGs and trash the BMPs, to make space. It's as crisp as BMP, and your screen as you're seeing things, but it's smaller file size and takes a lot more to fill up your harddrive.
In short, it's perfect. All of the advantages, none of the disadvantages.
Oh, wait. That's not entirely true. There are disadvantages for content creators: the white halo of dOOOOOOOOOOm.
When it comes to making textures, PNGs are not quite as perfect as you would hope.
If you are making textures with no alpha, you're golden. Now, if you're making those textures in PS, you want to make sure they are REALLY without alpha, due to the dreaded alpha flicker- so make sure your PNG is totally and entirely flattened before saving, and says Background, not Layer 03, in the layers palette. Layer 0 gives you an alpha channel you aren't using- so it all looks nice and lovely, but you get it in SL and put a texture with alpha in front of it and cam around...and oh crap. Our z sorting issue is the price we pay for features like light, so we put up with it....for now. Even though it can bite my shiny metal ass.
The problem with PNGs, see, is that any pixel that's fully alpha, doesn't exist in colourspace. And because we read things at multiple resolutions with SL, and the way that it deals with the transparency (I'm going with "it's all JPEG2000's fault"4, although I sort of mostly ignored that format because it did a lot of floundering and dying in the areas in which I was interested....it was totally someone's pet nerd project, to use JPEG2000. One of the devs fell in love with the format and convinced everyone else he was right), the dead space gets SEEN. And dead space = white. So you get white edges, because SL divides the image up into "pretty colours" and "this is what we see" and loads them separately.
(Note: That Interlaced or none prompt? Is a loading order thing5. It means nothing to you, since SL makes them JPEG2000. I always leave it on none.)
Oh, Wait, You Mean You Want Me to Use a Real Game Format, Mr. TGA?
Our workaround here, is the TGA. Now, TGAs have disadvantages: namely, like BMPs, they are inefficient in their lossless compresion. TGAs are an actual proper format used in game design for real things, and it's got all sorts of extras that BMPs don't, and that's part of why it has the file bloat- even if you aren't using it, it sort of leaves the door open and decides that it needs to keep track of it all anyway.
I didn't say it was really the most brightest crayon in the box. Just that it was what worked the best!
I save ALL of my textures as TGAs, regardless of whether they have an alpha channel or not. It's easier for me than flipping back and forth to PNG, but that's a decision I leave up to you. Things with alpha channels should be TGAs though, period.
You see, TGAs save the dead space! They do alpha channels separately. This can make them more of a pain to work with, if you're used to the PNG way of just leaving areas you don't want seen with nothing on them. Because, see, with TGAs, your entire image is filled, and flat, and you don't see the transparency at all. And in the next section....we'll talk about the solution to adding your transparency. Look, really useful stuff finally!
Masks, Channels, Alphas, and How to Make It Not a Filled Up Square
TGAs are so useful because the alphas are separate from the image. You paint outside the lines on the image proper, but you make the lines somewhere else. If you're unfamilar with this way of working, it might be a bit of a challenge adjusting how you do things to make it work. I'm not going to tell you the way to do that, you're going to have to find out what works for you, as everyone finds a different way to do things. (After all, they're sort of endless!)
Now, technically, this applies to CS2. It MAY apply to other versions, however, I make no guarantees.
Do you know about Masks? Masks are lovely. If you have every used an adjustment layer, you see that black and white box, where the white areas get the adjustment layer applied, and the blacks don't? That's a Mask. Basically, a Mask is a separate alpha channel you can apply to any layer or folder, it's a little black and white box that pops up next to your layer (or folder), that lets you draw on it in greyscale. White = visible, black = invisible, and the greys in between are the gradient along the way to give you pretty edges and not make things pixelated. To add a mask to any layer, select that layer and hit the square with the circle in the middle in the bottom of the layers tab. When you have a mask and a layer, the one actively selected will have a dotted box around it in the layers tab, so you know which one you're drawing on.

Yes, a drunken monkey drew this. Obviously, this is not what it should REALLY look like.
Now, to see your transparency in this brave new world of TGA, so things look like what's you're used to, make a folder, put evvvvvvverything in that folder, all your layers, and make new layers as you go in this folder, and make your mask on _that_ folder. Now, everything that gets seen, gets seen! And everything that doesn't, doesn't! It looks just like when you were doing PNGs! (Even if it means you have to _do_ it differently.)
When you turn that mask off, by holding Shift and clicking on it, you should see all the spaces outside the lines. Which should be very similar to the pixels next to them, that are seen. I leave it to you to decide how this is done. Fill a background layer behind it all with a colour that fits? Smudge an underlayer out? Draw all over the dead space in the first place and make things keep going? (This last one is my way, but I also come from a different graphic background....so I was doing it anyway.)
To make your mask, you have a few options. You can select a layer, or just make any selection, and either make your mask while that selection is active and it will apply it, or fill the mask with white (or black, if you want it invisible) in the selection (delete with your choice as the background colour, as a real fill may screw you over). You can also take your paintbrush and draw your mask right there as you go, using white to reveal areas, black to conceal. You can also use vector masks, which let you use Paths (PS's gimpy vector tools) to make hard edged selections that remain edittable. (Note: If you are interested in this, look up PS tutorials on Paths and Vector Masks for the techniques, I'm not going into it here. Its usefulness entirely depends on how you want to do things- it can be useful, or it can be extraneous and something you'll never want.)

Now, once you're done, and you've got your image that spreds out beyond the invisible edges, and your lovely alpha mask....Turn that alpha mask off. Hold Shift, and click on it, and boom! your lovely selection goes away. Now, select your alpha mask (ctrl+click on mask), and go to the Channels tab. It should be in the window with Layers, it should say "Layers", "Channels", and "Paths" for the tabs at the top. Make a new channel, the same way you make a new layer, and fill that with white by deleting, or hitting invert, or whatnot.

Now. DUPLICATE YOUR IMAGE. Trust me. You don't want to lose everything when you flatten it and accidentally save instead of save as. And you DO want to keep a layered backup, I'm sure you know by now!
Now, flatten your image. With the mask inactive, so it's all that messy outside the lines, and you have no lovely alpha....OR DO YOU? Because, see, you've got it in your channel!
Save your image as a tga. Make sure Alpha Channels is ticked on (and As a Copy isn't), then, it will prompt you:
16 bits/pixel
24 bits/pixel
32 bits/pixel
Ignore 16, forever and always, it means nothing to you. CHOOSE 32. If you have an alpha channel, you NEED 32. On the other hand....if you don't have an alpha channel, to get away from the dreaded flicker, you NEED 246. That says "oh hey, no alphas for us, nevermind!" instead of "I have an alpha channel even though it doesn't look like it, I just choose to make everything visible, so I can fuck with everything with transparency around me." Those extra 8 bits ARE the alpha, if it has that many, it has an alpha, period (and, as an added oh hey PS hates us bonus, if you don't have Alpha Channels ticked on in the save as dialog...it trashes your alpha channel and puts in a pure white one if you save as 32). If it doesn't have them, no alpha, regardless of your masking. You can open that file up again to look at it, and see if there is an extra channel there. (Remember, there will ALWAYS be 4 layers in there, for full view, red, green, and blue. The colour separations are awesome if you get into some wacky sculpting stuff- but generally not so useful with regular textures.)
Other uses for channels: you can cntl+click a channel and it will load that selection. If you have a selection you want to keep? Hey there sailor! There are also certain filters that can be used in conjunction with channels for whizbang effects. Now, you MUST make sure to delete all extraneous channels before you do your saving, since you don't want it to get confused!
For a last somewhat helpful note: if you're making clothing, save your image as 512x512, always. I make them double size, but my last step is scaling down. Why? Because SL will scale to 512x512 for you, regardless of what you want. That IS the resolution the avatar textures will be, period (and you gain nothing but crappy jagged edges if you go smaller). There is no way to squeeze more out, and this way you aren't making SL do another step of work, so things load better, faster, stronger. I work larger because I can play around with more detail and have more fine control.
1Ok, I'm not really THAT old. But I might be older than you. I remember the day before you young whippersnappers and your css, when we had to do all our formatting in HTML and tables, and we liked it.
2There was the BMP and PICT, of course, but I'm coming from a webnerd background here, and those were not viable options. Plus, I'll be getting to the BMP later.
3The thing you have to understand about computers, is that they're sort of dumb. They can't figure out there's no alpha unless you tell it repeatedly7. Flattening to Background is how you tell a PNG that no, really, FOR SURE, you didn't mean to have an alpha channel. Honestly. For reals. Trust me. No, really, PNG, I'm serious.
4In reality it's probably Photoshop's fault, with the way it does PNG alphas- since there AREN'T any pixels there in the first place, so it has to make shit up, and white is the colour of imaginary angel pixels, or something. However, I would really rather blame it on JPEG2000, because I keep grudges. Also, because of the way SL works, you get to see those imaginary pixels, so THERE, that IS JPEG2000's fault. Neener.
5Interlaced is kind of nifty for the web, back in the day when we were all on dialup and things went slooooooow. It would load the image in "stripes" kind of, instead of top down, so you would sort of see the image, and it would get clearer as it loaded. Kind of. Again, ignore.
6Again, see "computers are dumb". Because really, TGA, even though I told you once before already, I REALLY TRULY want an alpha channel if it's 32 bit7. And I REALLY DON'T if it's 24 bit. Also, if you save a TGA with a channel at 24 bit? Your channel GOES POOF. So make sure you save as the right bits! Also, this is another reason we make a duplicate of the image!
7There are, of course, limited cases in which you WANT an apparently solid image to actually have a transparency channel- if you're doing something fancy with invisiprims (like the flea with the magnifying glass), things that "look" solid will become invisible, and in limited cases, it's quite a clever effect. Just...not so awesome, unintentionally.
Thursday, April 10, 2008
Blender, the avatar, and you.
You know those evil seams? Yeah, there are things that, while not perfect, can make it easier. With Blender, you can draw right on the avatar. Not with the same precision as a graphics program (in my experience, at least, maybe you're better at it), but for matching up stuff in the problem areas? 100% awesome.
I'm not super great at tutorials, because I tend to skip steps, but here's hoping this is something that isn't totally random. I'm going to try to give a really basic crash course to take you through the whole system. And hope I haven't forgotten steps on the way.
Download Blender, install and all that. Blender is a very weird program, but I think the installation was reasonably straightforward.
Download these avatar Blender files:
(Note: the first one may not be good. The second one is more useful, it should be good as of now, up to when they decide to nuke it again.)
Default model for cross section seams- the avatar on the green axis line has some sections joined crosswise. The one next to it is divided up into each image. Both are in the T pose, so shoulders are not as useful for how things will really hang.
Ruth in 3 poses- the mother of us all. I don't find the model you download off the website to actually be accurate, this is actually Ruth. This is entirely divided into the per images, there are no cross image sections. Also, her feet are the Ruthfeet size, so don't sculpt shoes around it unless you're willing for them to not be size 0. Yes, one of them has shoe morphed feet with max height anyway. This is better for things you want to see the sleeves in, as well as being a nice way to preview what something will look like before importing to SL, if you don't have the clothing previewer (which I think you ought to, personally! I don't know how I could live without it, even with this. It's far more lightweight and compact for previewing). (Bonus for skinners and the like: the eyelashes should be connected properly, and the eyes are also included as a separate texture mapped thingie.)
I'll be working on more avatar models (including guys) to make seeing where things really go easier eventually. You can use the male model off of the website (note: you will have to do a lot of prep, including importing the .obj, which requires a plugin), but I find that it doesn't map particularly true in a lot of areas.
Open the file of choice. Now the fun starts, because there are a jillion and 4 options in Blender, and it can be daunting. Below the black avatar wireframes, there should be a menu. You should be in Object Mode, which is what you need to switch to any time you want to choose which part of the model you want to work on.
First, a note on camera: Hold down Alt, and the mouse button, and you rotate around. Alt+Shift and mouse, and Alt+Ctrl and mouse move different ways (drag around the scene, zoom in/out). I just hold down alt and play around with the others to see what's what, since everything has to use a different camera and it's hard to keep straight! If you've got a mouse with a scrolly wheel, that also zooms in and out (generally, mouse settings vary and all).
Here, have a picture that may not help much that I've scribbled all over:
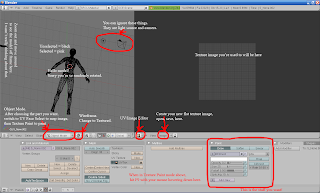
I've spliced the bottom there in while in Texture Paint, you can't see all of those options while in Object Mode!
Choose the bit you want to work with, with the right button. If you want to join parts of the model together (note, this will mean they share texture images! So don't join unless you _want_ that), shift, select the other parts, and then Ctrl+J to join. Note: Blender does very weird sensitive submenus, if you mouse off of it before clicking to verify, it will not do what you ask! This includes things like saving! Joining is useful with the 3 avatar file, as you can join all the heads, all the torsos, all the legs, and they will all update at once. Currently they are each separate.
The new version of Blender has done away with UV Face Select mode, and collapsed it into Edit mode. Change everywhere I say "UV Face Select" to "Edit Mode" if your version of Blender doesn't have UV Face Select.
Once you've got your selection, go to the Object Mode dropdown, and choose UV Face Select. Now, the windows should all be set up such that in the next panel, you will now see the UV outlines for that piece laid out in that space (this is the UV/Image Editor mode, which only has a face icon visible, click on the dropdown to see the name). If that panel does not have them outlined, hover over the avatar and press A (select all, which toggles selection on and off). It should be selected unless you've clicked off of it. At any time you can unselect a section, if you've clicked on one face, and then select the entire model by pressing A twice (yes, just A, no shift, control, or alt. And you have to have your mouse hovering that section). Your image will not be applied to the entire model, unless the entire model is selected. That includes not being able to draw on it, even though it looks like it's right there.
If you are using the cross image seamed avatar, the stomach will have lines at the bottom, and the pelvis at the top, but the legs and arms and such won't be there! This way we can draw across it all on one image, and it will update top and bottom. You'll have to divide these out later, as well as the fact it won't do anything about the parts that aren't outlined there. (Note: I tend to not do this that much actually due to laziness, since I have to splice out the pieces back to where they belong. Your mileage may vary.)
In the panel with the UV map laid out, go to the Image menu, New, or Open (note: I think it only accepts tgas, but it ignores transparency entirely1, so denote that with a contrasting colour when working on it), and either create a new image of your choice or import something you want to check. Remember, if you're doing the stomach/pelvis, you will have had to prep an image to have both of the necessary pieces in it, that you will divide back up again later.
1This is no longer true in newer versions of Blender. It DOES do transparency, so save your working copies as 24 bit tgas, or don't drop your channel in. Transparency is awesome for trying to get the $*%@#! skirt mesh to line up, crap for everything else.
The image should now appear under the UV map. To get it to appear on your avatar, in the menu under it, there is a strange outlined box thing next to UV Face Select. Click on that dropdown, and choose Textured.
To actually _do_ something with all of this, change UV Face Select to Texture Paint. Hit A to deselect the model so you can see it better. The vertex lines will still be there. If you want them to go away, switch to Object Mode and then to Texture Paint (don't change your selection any), and it will just outline the entire thing in a light pink line around the area you're working on. Both things have their uses.
In the bottom panel that has all that scary menu text, hover your mouse, and hit F9. The Paint panel lets you choose paint colour, opacity, brush size, and all that fun stuff. Draw all over the avatar! Once you're done, go back to that Image menu where you created a new image or opened one you already had, and save it. Blender WILL let you close things without saving! It does not prompt!
If you want to save what you've done with the model as a whole, for instance the joining, you can save it under the File menu. As I said before, Blender does not prompt for saving if you've changed anything!
It actually is less complicated than it looks, once you've done it a few times!
I'm not super great at tutorials, because I tend to skip steps, but here's hoping this is something that isn't totally random. I'm going to try to give a really basic crash course to take you through the whole system. And hope I haven't forgotten steps on the way.
Download Blender, install and all that. Blender is a very weird program, but I think the installation was reasonably straightforward.
Download these avatar Blender files:
(Note: the first one may not be good. The second one is more useful, it should be good as of now, up to when they decide to nuke it again.)
Default model for cross section seams- the avatar on the green axis line has some sections joined crosswise. The one next to it is divided up into each image. Both are in the T pose, so shoulders are not as useful for how things will really hang.
Ruth in 3 poses- the mother of us all. I don't find the model you download off the website to actually be accurate, this is actually Ruth. This is entirely divided into the per images, there are no cross image sections. Also, her feet are the Ruthfeet size, so don't sculpt shoes around it unless you're willing for them to not be size 0. Yes, one of them has shoe morphed feet with max height anyway. This is better for things you want to see the sleeves in, as well as being a nice way to preview what something will look like before importing to SL, if you don't have the clothing previewer (which I think you ought to, personally! I don't know how I could live without it, even with this. It's far more lightweight and compact for previewing). (Bonus for skinners and the like: the eyelashes should be connected properly, and the eyes are also included as a separate texture mapped thingie.)
I'll be working on more avatar models (including guys) to make seeing where things really go easier eventually. You can use the male model off of the website (note: you will have to do a lot of prep, including importing the .obj, which requires a plugin), but I find that it doesn't map particularly true in a lot of areas.
Open the file of choice. Now the fun starts, because there are a jillion and 4 options in Blender, and it can be daunting. Below the black avatar wireframes, there should be a menu. You should be in Object Mode, which is what you need to switch to any time you want to choose which part of the model you want to work on.
First, a note on camera: Hold down Alt, and the mouse button, and you rotate around. Alt+Shift and mouse, and Alt+Ctrl and mouse move different ways (drag around the scene, zoom in/out). I just hold down alt and play around with the others to see what's what, since everything has to use a different camera and it's hard to keep straight! If you've got a mouse with a scrolly wheel, that also zooms in and out (generally, mouse settings vary and all).
Here, have a picture that may not help much that I've scribbled all over:

I've spliced the bottom there in while in Texture Paint, you can't see all of those options while in Object Mode!
Choose the bit you want to work with, with the right button. If you want to join parts of the model together (note, this will mean they share texture images! So don't join unless you _want_ that), shift, select the other parts, and then Ctrl+J to join. Note: Blender does very weird sensitive submenus, if you mouse off of it before clicking to verify, it will not do what you ask! This includes things like saving! Joining is useful with the 3 avatar file, as you can join all the heads, all the torsos, all the legs, and they will all update at once. Currently they are each separate.
The new version of Blender has done away with UV Face Select mode, and collapsed it into Edit mode. Change everywhere I say "UV Face Select" to "Edit Mode" if your version of Blender doesn't have UV Face Select.
Once you've got your selection, go to the Object Mode dropdown, and choose UV Face Select. Now, the windows should all be set up such that in the next panel, you will now see the UV outlines for that piece laid out in that space (this is the UV/Image Editor mode, which only has a face icon visible, click on the dropdown to see the name). If that panel does not have them outlined, hover over the avatar and press A (select all, which toggles selection on and off). It should be selected unless you've clicked off of it. At any time you can unselect a section, if you've clicked on one face, and then select the entire model by pressing A twice (yes, just A, no shift, control, or alt. And you have to have your mouse hovering that section). Your image will not be applied to the entire model, unless the entire model is selected. That includes not being able to draw on it, even though it looks like it's right there.
If you are using the cross image seamed avatar, the stomach will have lines at the bottom, and the pelvis at the top, but the legs and arms and such won't be there! This way we can draw across it all on one image, and it will update top and bottom. You'll have to divide these out later, as well as the fact it won't do anything about the parts that aren't outlined there. (Note: I tend to not do this that much actually due to laziness, since I have to splice out the pieces back to where they belong. Your mileage may vary.)
In the panel with the UV map laid out, go to the Image menu, New, or Open (note: I think it only accepts tgas, but it ignores transparency entirely1, so denote that with a contrasting colour when working on it), and either create a new image of your choice or import something you want to check. Remember, if you're doing the stomach/pelvis, you will have had to prep an image to have both of the necessary pieces in it, that you will divide back up again later.
1This is no longer true in newer versions of Blender. It DOES do transparency, so save your working copies as 24 bit tgas, or don't drop your channel in. Transparency is awesome for trying to get the $*%@#! skirt mesh to line up, crap for everything else.
The image should now appear under the UV map. To get it to appear on your avatar, in the menu under it, there is a strange outlined box thing next to UV Face Select. Click on that dropdown, and choose Textured.
To actually _do_ something with all of this, change UV Face Select to Texture Paint. Hit A to deselect the model so you can see it better. The vertex lines will still be there. If you want them to go away, switch to Object Mode and then to Texture Paint (don't change your selection any), and it will just outline the entire thing in a light pink line around the area you're working on. Both things have their uses.
In the bottom panel that has all that scary menu text, hover your mouse, and hit F9. The Paint panel lets you choose paint colour, opacity, brush size, and all that fun stuff. Draw all over the avatar! Once you're done, go back to that Image menu where you created a new image or opened one you already had, and save it. Blender WILL let you close things without saving! It does not prompt!
If you want to save what you've done with the model as a whole, for instance the joining, you can save it under the File menu. As I said before, Blender does not prompt for saving if you've changed anything!
It actually is less complicated than it looks, once you've done it a few times!
Friday, March 21, 2008
Limitations of Blogger
I've been hunting for a while for a way to do cuts. So far...not good options. I want to do a proper CUT, which doesn't show the stuff anywhere but on the page for the post itself. This is great for, say, cutting bits for the feed to chunk a post nicely. WTB lj-cut text="This should be simple"
Apparently, not so much. This looks like the most straightforward manner (and, don't try to use Blogger's official help as it's completely hopeless and incomprehensible). But, this does 2 things. 1) if you can find the body tag (which, I can't), and add the second bit, every single post will have the "read more" link, regardless of whether it's got a cut or not (if not, you need to manually add a link to the post before the cut to take people to the page with the rest of it). 2) And in my mind, the thing that makes it useless, all it's doing is having you drop the stuff you want cut in a span that it hides. Which means...it's still there. All of it. Just invisible only on your page o' posts because that's the only place the stylesheet turns it off. Feedreaders completely ignore the cuts, and show the full text, because they haven't been told to ignore it with css.
Wordpress appears to have a _real_ way to do cuts, I'm pretty disappointed blogger doesn't even consider the possibility.
Apparently, not so much. This looks like the most straightforward manner (and, don't try to use Blogger's official help as it's completely hopeless and incomprehensible). But, this does 2 things. 1) if you can find the body tag (which, I can't), and add the second bit, every single post will have the "read more" link, regardless of whether it's got a cut or not (if not, you need to manually add a link to the post before the cut to take people to the page with the rest of it). 2) And in my mind, the thing that makes it useless, all it's doing is having you drop the stuff you want cut in a span that it hides. Which means...it's still there. All of it. Just invisible only on your page o' posts because that's the only place the stylesheet turns it off. Feedreaders completely ignore the cuts, and show the full text, because they haven't been told to ignore it with css.
Wordpress appears to have a _real_ way to do cuts, I'm pretty disappointed blogger doesn't even consider the possibility.
Sunday, January 27, 2008
SLUP!
I'm trying out SLUP, which lets you upload 20 textures a month for free. I hadn't really known what I was going to use it for, and I'm still not sure how much I shall, but I figured it was a neat thing to have, just in case, someday. Maybe pictures of my cats when I'm feeling cheap.
I might use it when the Beta Grid's being a pissy beast. Like, oh, now. Eventually I plan to have real avatars exported so I don't need to do as much testing on things with the less-than-accurate models they provide for us.
Note: it's in Japanese, so my very broken and out of practice kana tells me that キャンセル means "Cancel" and アップロード means "Upload". Aside from that...just guess a lot, like I do, I suppose. Currently there is no tga or png support, although it appears planned (I tried a bmp however, and it appeared to work- but there are no options in the SLUP like upload lossless and such). When you upload, the creator will be slup Reiko, not you- they do not ask for your SL account info beyond your username. As such, I wouldn't really recommend it for anything you want to have your name as creator on, obviously- which is why I shan't be using it for real versions, but I might use it to, say, compare SLuploader and regularly uploaded versions of sculpties. (As an aside, I uploaded a couple of small textures that needed pixel perfect reproductions, and while it may be on SL's part when you see it, even with SLuploader, they are not pixel perfect, and the seams are quite obvious. Means that I will have to unnecessarily use larger textures for some things, which it somewhat irksome. I'm trying to reduce the load on your system here, and you just tell me no.)
I might use it when the Beta Grid's being a pissy beast. Like, oh, now. Eventually I plan to have real avatars exported so I don't need to do as much testing on things with the less-than-accurate models they provide for us.
Note: it's in Japanese, so my very broken and out of practice kana tells me that キャンセル means "Cancel" and アップロード means "Upload". Aside from that...just guess a lot, like I do, I suppose. Currently there is no tga or png support, although it appears planned (I tried a bmp however, and it appeared to work- but there are no options in the SLUP like upload lossless and such). When you upload, the creator will be slup Reiko, not you- they do not ask for your SL account info beyond your username. As such, I wouldn't really recommend it for anything you want to have your name as creator on, obviously- which is why I shan't be using it for real versions, but I might use it to, say, compare SLuploader and regularly uploaded versions of sculpties. (As an aside, I uploaded a couple of small textures that needed pixel perfect reproductions, and while it may be on SL's part when you see it, even with SLuploader, they are not pixel perfect, and the seams are quite obvious. Means that I will have to unnecessarily use larger textures for some things, which it somewhat irksome. I'm trying to reduce the load on your system here, and you just tell me no.)
Monday, January 7, 2008
Texturing the Avatar with Blender
You should know basics of texturing first- see Natalia Zelmanov's tutorials, they are quite well done.
Mostly I recommend this for seam matching and some previewing, I, at least, don't have the sort of fine control to want to use Blender to do the whole thing (especially without layers!), but seams can be a bitch (although I did just paint a sculpty in Blender, and he came out pretty nice really- but still, I did a little bit of post processing in Photoshop to make it all happy and right). I just figured out how to maybe make them less bitchy! I would have loved knowing this forever ago. But at least now I have hope with this damn corset that's been giving me a headache and still not quite working with massive amounts of guessing and zooming and pixel tweaking (stupid complex irregular pattern).
Go to the SL site and download the avatar mesh, if you haven't. Mostly you will have it somewhere, in some form, because you're using something to preview it unless you really are crazy and like working without a net (I do all my previewing with the SL Clothing Previewer- it isn't perfect by any means, but it gives me enough of an idea I can manage in most cases), but basically, you need a file that ends in .obj that has the avatar mesh (male or female, I always work on female because I find it wraps a bit more accurately to SL, although still not accurate, especially around the face).
Go to the Blender importer page and grab the Wavefront obj one, and put in your Program Files\Blender Foundation\Blender\.blender\scripts directory, as previously stated in the av painting intro.
Delete the cylinder that's probably there with the delete key (and say yes...Blender's popups sure can be annoying). Go through the same annoying importing in Blender: File->Import->Wavefront (.obj), navigate the clunky file navigation, don't move your cursor because the popup window will go away and leave you wondering why everything's broken, say ok to the popup at default values. Now you should have a teensy tiny person. Zoom in (remember nav keys are holding down alt and nothing, shift, or ctrl, and the left mouse button, as well as the middle scrollwheel doing strange and potentially useful things). You're still in Object Mode, so select the pieces you want to match seams on. For matching the waist seams, select the stomach and then shift select the pelvis to have both of them highlighted, and ctrl-J to join them into one (say yes to another annoying popup). GLEE. Now that horrible awkward seam there can be painted directly on! (Do a separate join and image for the arm and shoulder seams, so you don't have things overlapping on the UV map, since those are also one of the horrible things, same with legs.)
With your stomachpelvis selected still, choose UV Face Select Mode in the dropdown menu. In the dropdown next to it, pick Textured, the weird nobbly thing at the top. Your second window, as always, should be the UV/Image Editor, and you should see odd highlighted outlines of the stomach and the pelvis, in the places in the image that they are in the map files we get to do all of our mapping from.
Now, your choice: you probably have something that just needs some seam fixing, so take the pelvis part of that and paste it in the proper place at the top over an image that has the stomach part, and Open that image in the UV/Image Editor; or you can just paint the whole thing directly onto the avatar mesh in Blender. Me, I'll be going with option 1, because I am far more comfortable with my lots of layers and things in Photoshop. (When doing the shoulder/arm seams you can just grab an upper body texture without the splicing, since it's all in one image to begin with.)
Hit A to deselect all, so you can see what you're doing better (The light grey lines are still slightly annoying, but they do show you were you need to pay attention to, and they aren't super huge), and change the UV/Face Select panel with your 3D view to Texture Paint Mode. In the Buttons panel with all the menu options, hit F9 to go to Editting, and play around with your brush settings in the Paint panel.
I'll be importing particular layers with the parts (wrinkles, etc.) that go over the edges, not the finished product, myself (both so I can keep working with all my layers, and so it's easier to finish the fine tuning fixing). Also, note that it doesn't always do the very edge that's only a partial pixel- keep in mind that you will probably still need to clean up and expand those parts to make them work properly (especially with shrinking down, since you ought to be working at 1024, at least), as well as the fact it tends to do hard pixely edges if you've dropped your brush small enough for detail work. Once you've finished with this image, Save it off in the UV/Image Editor window menu, and then you can move to cleanup in something else. Once you've done all that cleaning, import it again to make sure you've pulled things across properly.
It might be a good idea to save your joined up avatar for later, so you don't have to reimport and rejoin all the assorted bits. You may want two copies, one with the upper all together, and the lower all together, and a second with the upper/lower joins, since side seams are also a pain to align (this might speed up my guess, import to the clothing previewer, move one part one pixel up, import to clothing previewer, move one more pixel up and one over, import to clothing previewer...etc.)
Of course, there's also the importing into SL to take into account- things will not be as perfect there as they are here. For one, avatar textures get resized to 512, for another we have to deal with the crappy JPEG2000 compression. In fact, I find to match up my waist seams, I usually have to import the lower body that connects to an upper at 1024 (i.e. my corsets- they have enough fine detail it really does matter, the coats don't), just to trick the compression into being less awful (I upload everything else at 512, including lower bodies that don't need to match up exactly).
Mostly I recommend this for seam matching and some previewing, I, at least, don't have the sort of fine control to want to use Blender to do the whole thing (especially without layers!), but seams can be a bitch (although I did just paint a sculpty in Blender, and he came out pretty nice really- but still, I did a little bit of post processing in Photoshop to make it all happy and right). I just figured out how to maybe make them less bitchy! I would have loved knowing this forever ago. But at least now I have hope with this damn corset that's been giving me a headache and still not quite working with massive amounts of guessing and zooming and pixel tweaking (stupid complex irregular pattern).
Go to the SL site and download the avatar mesh, if you haven't. Mostly you will have it somewhere, in some form, because you're using something to preview it unless you really are crazy and like working without a net (I do all my previewing with the SL Clothing Previewer- it isn't perfect by any means, but it gives me enough of an idea I can manage in most cases), but basically, you need a file that ends in .obj that has the avatar mesh (male or female, I always work on female because I find it wraps a bit more accurately to SL, although still not accurate, especially around the face).
Go to the Blender importer page and grab the Wavefront obj one, and put in your Program Files\Blender Foundation\Blender\.blender\scripts directory, as previously stated in the av painting intro.
Delete the cylinder that's probably there with the delete key (and say yes...Blender's popups sure can be annoying). Go through the same annoying importing in Blender: File->Import->Wavefront (.obj), navigate the clunky file navigation, don't move your cursor because the popup window will go away and leave you wondering why everything's broken, say ok to the popup at default values. Now you should have a teensy tiny person. Zoom in (remember nav keys are holding down alt and nothing, shift, or ctrl, and the left mouse button, as well as the middle scrollwheel doing strange and potentially useful things). You're still in Object Mode, so select the pieces you want to match seams on. For matching the waist seams, select the stomach and then shift select the pelvis to have both of them highlighted, and ctrl-J to join them into one (say yes to another annoying popup). GLEE. Now that horrible awkward seam there can be painted directly on! (Do a separate join and image for the arm and shoulder seams, so you don't have things overlapping on the UV map, since those are also one of the horrible things, same with legs.)
With your stomachpelvis selected still, choose UV Face Select Mode in the dropdown menu. In the dropdown next to it, pick Textured, the weird nobbly thing at the top. Your second window, as always, should be the UV/Image Editor, and you should see odd highlighted outlines of the stomach and the pelvis, in the places in the image that they are in the map files we get to do all of our mapping from.
Now, your choice: you probably have something that just needs some seam fixing, so take the pelvis part of that and paste it in the proper place at the top over an image that has the stomach part, and Open that image in the UV/Image Editor; or you can just paint the whole thing directly onto the avatar mesh in Blender. Me, I'll be going with option 1, because I am far more comfortable with my lots of layers and things in Photoshop. (When doing the shoulder/arm seams you can just grab an upper body texture without the splicing, since it's all in one image to begin with.)
Hit A to deselect all, so you can see what you're doing better (The light grey lines are still slightly annoying, but they do show you were you need to pay attention to, and they aren't super huge), and change the UV/Face Select panel with your 3D view to Texture Paint Mode. In the Buttons panel with all the menu options, hit F9 to go to Editting, and play around with your brush settings in the Paint panel.
I'll be importing particular layers with the parts (wrinkles, etc.) that go over the edges, not the finished product, myself (both so I can keep working with all my layers, and so it's easier to finish the fine tuning fixing). Also, note that it doesn't always do the very edge that's only a partial pixel- keep in mind that you will probably still need to clean up and expand those parts to make them work properly (especially with shrinking down, since you ought to be working at 1024, at least), as well as the fact it tends to do hard pixely edges if you've dropped your brush small enough for detail work. Once you've finished with this image, Save it off in the UV/Image Editor window menu, and then you can move to cleanup in something else. Once you've done all that cleaning, import it again to make sure you've pulled things across properly.
It might be a good idea to save your joined up avatar for later, so you don't have to reimport and rejoin all the assorted bits. You may want two copies, one with the upper all together, and the lower all together, and a second with the upper/lower joins, since side seams are also a pain to align (this might speed up my guess, import to the clothing previewer, move one part one pixel up, import to clothing previewer, move one more pixel up and one over, import to clothing previewer...etc.)
Of course, there's also the importing into SL to take into account- things will not be as perfect there as they are here. For one, avatar textures get resized to 512, for another we have to deal with the crappy JPEG2000 compression. In fact, I find to match up my waist seams, I usually have to import the lower body that connects to an upper at 1024 (i.e. my corsets- they have enough fine detail it really does matter, the coats don't), just to trick the compression into being less awful (I upload everything else at 512, including lower bodies that don't need to match up exactly).
Sunday, January 6, 2008
Importing Sculpt Maps to Blender
Say you are (an idiot) like me, and after playing around with modifying a sculpty you've been working on you remapped the UV and saved that off....and then forgot to save the file. Since Blender doesn't prompt to save new versions when you've changed something, sometimes you accidentally screw yourself.
Step one: curse profusely. Step two: do a google search and find these plug ins (if you can't see the forum post for whatever reason, here's the download link (and thank you, Domino Marama).
Drop those files in your Program Files\Blender Foundation\Blender\.blender\scripts directory (only the import_sculptie.py is required for importing, however the others may be useful!), and there should be an option in your File->Import dropdown that makes the magic happen. Yay! Once again, watch for that option popup (read the readme attached for what the options do, this time some of them actually are useful to change sometimes, although it defaults to what you usually want to work with, assuming sphere mapping and less pain with seams).
If you change your sculpt and need to remap it any, you will have to add a new material (F5), set to Texface, add three new textures set to blend (F6), and set them (F5) to: x, blank blank, red 1.0, Add; y, blank, blank, green 1.0, Add; z, blank, blank, blue 1.0, Add, and then Bake (F10) Textures, going through the normal material setup (I've gone over that in more detail before if this is too sketchy for you, however, these are the reminder for the things that need to be hit). Once the new materials are added and set up, hit that big Bake button, as you should know by now, to make with the flavour rainbow- and now we're back to just as if we hadn't lost it all in the first place. (One can also use Rokuro for the basic shape and import for making it a less regimented shape in this way, so if we wanted to not admit I'm an idiot, we would use this as the excuse for figuring it out instead.)
Step one: curse profusely. Step two: do a google search and find these plug ins (if you can't see the forum post for whatever reason, here's the download link (and thank you, Domino Marama).
Drop those files in your Program Files\Blender Foundation\Blender\.blender\scripts directory (only the import_sculptie.py is required for importing, however the others may be useful!), and there should be an option in your File->Import dropdown that makes the magic happen. Yay! Once again, watch for that option popup (read the readme attached for what the options do, this time some of them actually are useful to change sometimes, although it defaults to what you usually want to work with, assuming sphere mapping and less pain with seams).
If you change your sculpt and need to remap it any, you will have to add a new material (F5), set to Texface, add three new textures set to blend (F6), and set them (F5) to: x, blank blank, red 1.0, Add; y, blank, blank, green 1.0, Add; z, blank, blank, blue 1.0, Add, and then Bake (F10) Textures, going through the normal material setup (I've gone over that in more detail before if this is too sketchy for you, however, these are the reminder for the things that need to be hit). Once the new materials are added and set up, hit that big Bake button, as you should know by now, to make with the flavour rainbow- and now we're back to just as if we hadn't lost it all in the first place. (One can also use Rokuro for the basic shape and import for making it a less regimented shape in this way, so if we wanted to not admit I'm an idiot, we would use this as the excuse for figuring it out instead.)
Saturday, January 5, 2008
Blender and Av painting intro
I'm still learning the ropes in texturing in Blender quite heavily, but I'm currently trying to paint a sculpty to go with avatar mesh stuff, so here are some notes to remind myself how to not be frustrated for 3 hours trying to figure out why my view is on crack.
First step is to download the av meshes- SL's website has that downlaod section with the obj files, and I think I have 7 other copies from other sources (q/avimator might have them in formats that help, the clothing previewer, who knows what else). I do basically everything on the female mesh. One part because I am one, and one part because I find the "default" male mesh doesn't wrap quite right (of course, the one in SL is somewhat of an annoying mess, I think, as well- just in slightly different ways).
Next is to import- go to Blender's importer list and snag the Wavefront OBJ Importer/Exporter, drop that file in your Program Files\Blender Foundation\Blender\.blender\scripts directory.
Fire up Blender and choose File->Import->Wavefront .obj, and a file menu will appear at the bottom. Navigate through the amazingly clunky DOS like interface to find your file, and import it- but don't move your cursor from the button! This popup happens with all sorts of options which you mostly want to ignore, and just hit ok. However, if you move your cursor it disappears and your file does not import, and you're standing there going "well, crap. I thought that was supposed to work" for a month or two.
The avatar imports really small, so zoom in to see it. It's also all detached bits, select all the ones that map together with shift, and hit crtl-J to join them into one (everything will be UV mapped properly). I haven't tried it because I just figured this all out tonight, but I'll bet you can connect the top of the lower body and the bottom of the upper, and be able to paint across those dastardly seams!
When trying to paint a sculpt with the av mesh around for reference, still in Object mode select the avatar first, then shift select the sculpt so it's last selected. This way you won't get the sculpt making the avatar invisible walls (try switching to UV Face Select just with the sculpt selected, and you will probably see what I mean. It drove me nuts for a bit until I found out how to make it not happen. EDIT: Or even with it your view may decide to be on crack with a new file for NO APPARENT REASON even when you do do this, so...yeah, I've got to find a new way to trick it into behaving). To put an existing texture on the avatar mesh (or anything else), select it in Object mode, select all in UV Face Select mode, and then import your image. You can paint directly on that in Texture Paint mode, as well.
First step is to download the av meshes- SL's website has that downlaod section with the obj files, and I think I have 7 other copies from other sources (q/avimator might have them in formats that help, the clothing previewer, who knows what else). I do basically everything on the female mesh. One part because I am one, and one part because I find the "default" male mesh doesn't wrap quite right (of course, the one in SL is somewhat of an annoying mess, I think, as well- just in slightly different ways).
Next is to import- go to Blender's importer list and snag the Wavefront OBJ Importer/Exporter, drop that file in your Program Files\Blender Foundation\Blender\.blender\scripts directory.
Fire up Blender and choose File->Import->Wavefront .obj, and a file menu will appear at the bottom. Navigate through the amazingly clunky DOS like interface to find your file, and import it- but don't move your cursor from the button! This popup happens with all sorts of options which you mostly want to ignore, and just hit ok. However, if you move your cursor it disappears and your file does not import, and you're standing there going "well, crap. I thought that was supposed to work" for a month or two.
The avatar imports really small, so zoom in to see it. It's also all detached bits, select all the ones that map together with shift, and hit crtl-J to join them into one (everything will be UV mapped properly). I haven't tried it because I just figured this all out tonight, but I'll bet you can connect the top of the lower body and the bottom of the upper, and be able to paint across those dastardly seams!
When trying to paint a sculpt with the av mesh around for reference, still in Object mode select the avatar first, then shift select the sculpt so it's last selected. This way you won't get the sculpt making the avatar invisible walls (try switching to UV Face Select just with the sculpt selected, and you will probably see what I mean. It drove me nuts for a bit until I found out how to make it not happen. EDIT: Or even with it your view may decide to be on crack with a new file for NO APPARENT REASON even when you do do this, so...yeah, I've got to find a new way to trick it into behaving). To put an existing texture on the avatar mesh (or anything else), select it in Object mode, select all in UV Face Select mode, and then import your image. You can paint directly on that in Texture Paint mode, as well.
Friday, January 4, 2008
Some getting started in Blender
SL is being a crashy little bitch tonight, so I might as well get to some of this finally.
Work smarter, not harder: download the premapped sphere. I have my own that I did the hard way, with a bit different window set up, but this means you don't have to go through all that! And really, my setup is not much different. One less window on the side (I just have one 3d view and the texture on the side, then the panels at the bottom). But, this gets you what you need, so run with it!
Spheres are the most useful to me. Nine times out of ten, I'm using a sphere to start. Occasionally another shape is better, and for that you will have to prep your own- this tutorial gives you a pretty good rundown on that, just choose a different shape for starters if necessary (remember to prep your seams: it has to be able to unmap into one big flat square, so you need a top, a bottom, and 2 sides. Also keep in mind that it has to be a perfect grid).
In the big window with your rainbow sphere, switch from Object Mode to Sculpt Mode in the dropdown. You may find switching to Solid in the dropdown next to that is more useful, since otherwise you can't really see highs and lows and shadows so well. Hit F9 while hovering over the Panels at the bottom to bring up the Editing Panel, and the third block of things over should have tabs: Multirez, Sculpt, Brush. Hit up the Sculpt tab, and start playing with brushes! I start off by blocking out my basic shape (the wireframe view may even be of use here, so you can see your vertices: where your vertices are counts! Textures will map differently, you'll have different amounts of detail, and you may need to cluster vertices in certain areas and leave others as large expanses to get the detail in the model you need) with grab, draw, and even hopping over to the Edit Mode and grabbing points and shoving them where I want them. First run of my sculpts are usually very rough sketches, just to get everything in vaguely the right vicinity. I go in and clean them up with a lot of the smooth tool, white still flipping back and forth with the others to keep detail. Some things require hopping over to Edit to pull individual vertices where they ought to be. Select with the right mouse button (hold down shift for more than one), then hit G to move them around. I cannot tell you how long it took me to stumble across the right thing to find that.
Watch your poles. Depending on how you're going to map, they may make a huge difference. Because you're starting with a mapped sphere, there are no end points. Look in wireframe to see the fact you've got open circles at each end. This causes some problems. If you're not mapping sphere, these ends are going to do other things, but in that case you know what they'll do, so I'm ignoring it. If mapping sphere however, those ends are going to be somewhat messily filled in, with textures pulled off the other side of the model if the texture is mapped 1x1. I've talked about it before at more length, this is just a reminder- grab the whole line of them, and shrink them down to one point, and work with them that way. I usually do that earlier _and_ later in the modeling, as I generally end up pulling them out of whack when prodding at my shape. Select two vertices next to each other, hit ctrl-E and select Edge Loop Select to highlight the whole circle of them, then S and scale it all down to one little bit. Now you don't have to worry as much about texturing (but keep in mind, if either end is massively different in texture, you're going to end up with the dotbleed you already get on spheres at 1x1 texturing).
Switch brushes in that bottom panel, type and size both, to achieve different effects. There are easy peasy symmetry buttons at the bottom of that too- if your model needs to be symmetrical select what you need- you can do a lot of your modeling with symmetry to get the basic shape, and then take it off to do more detailing on either side as well.
Basic camera controls: Hold down alt and left mouse button rotates. Alt+crtl+left button zooms, alt+shift+left button moves. The scroll wheel does odd things in these modes as well that you may or may not find useful.
At a glance, I think the map you come with is 64x64, which is what you want, so you can even just bake over that and save it off. Once you've got your sculpting all happy (for starting out, try something simple so as to not get frustrated: I have a long line of wacky melty skulls I played around with, only some of which I've bothered to keep, but basic construction is one direction symmetry, poke some holes for eyes, poke a nose hole, and shove around the jaw. I wasn't going for realism, because I knew I couldn't attain it, as well as not really caring to achieve it), hit F10 in the Panels, and press that big Bake button in the Bake tab. Your rainbow image should now look like a different rainbow image, save that off as a tga, and ta-dah! you've got a sculpty!
Of course, make sure you save a new file often during this process so you can go back when you've messed up when trying to make it better and suchlike. I usually have 10 or 20 versions of even reasonably simple things, just in case I need to go back. Once you've got it sculpted, save off your final version, trash the earliers unless they have potential to turn into something else, and then you can move on to some of the evils of texturing. You've already gotten enough of a crash course here in the tools that you should be able to sort of muddle your way through it, I think.
Work smarter, not harder: download the premapped sphere. I have my own that I did the hard way, with a bit different window set up, but this means you don't have to go through all that! And really, my setup is not much different. One less window on the side (I just have one 3d view and the texture on the side, then the panels at the bottom). But, this gets you what you need, so run with it!
Spheres are the most useful to me. Nine times out of ten, I'm using a sphere to start. Occasionally another shape is better, and for that you will have to prep your own- this tutorial gives you a pretty good rundown on that, just choose a different shape for starters if necessary (remember to prep your seams: it has to be able to unmap into one big flat square, so you need a top, a bottom, and 2 sides. Also keep in mind that it has to be a perfect grid).
In the big window with your rainbow sphere, switch from Object Mode to Sculpt Mode in the dropdown. You may find switching to Solid in the dropdown next to that is more useful, since otherwise you can't really see highs and lows and shadows so well. Hit F9 while hovering over the Panels at the bottom to bring up the Editing Panel, and the third block of things over should have tabs: Multirez, Sculpt, Brush. Hit up the Sculpt tab, and start playing with brushes! I start off by blocking out my basic shape (the wireframe view may even be of use here, so you can see your vertices: where your vertices are counts! Textures will map differently, you'll have different amounts of detail, and you may need to cluster vertices in certain areas and leave others as large expanses to get the detail in the model you need) with grab, draw, and even hopping over to the Edit Mode and grabbing points and shoving them where I want them. First run of my sculpts are usually very rough sketches, just to get everything in vaguely the right vicinity. I go in and clean them up with a lot of the smooth tool, white still flipping back and forth with the others to keep detail. Some things require hopping over to Edit to pull individual vertices where they ought to be. Select with the right mouse button (hold down shift for more than one), then hit G to move them around. I cannot tell you how long it took me to stumble across the right thing to find that.
Watch your poles. Depending on how you're going to map, they may make a huge difference. Because you're starting with a mapped sphere, there are no end points. Look in wireframe to see the fact you've got open circles at each end. This causes some problems. If you're not mapping sphere, these ends are going to do other things, but in that case you know what they'll do, so I'm ignoring it. If mapping sphere however, those ends are going to be somewhat messily filled in, with textures pulled off the other side of the model if the texture is mapped 1x1. I've talked about it before at more length, this is just a reminder- grab the whole line of them, and shrink them down to one point, and work with them that way. I usually do that earlier _and_ later in the modeling, as I generally end up pulling them out of whack when prodding at my shape. Select two vertices next to each other, hit ctrl-E and select Edge Loop Select to highlight the whole circle of them, then S and scale it all down to one little bit. Now you don't have to worry as much about texturing (but keep in mind, if either end is massively different in texture, you're going to end up with the dotbleed you already get on spheres at 1x1 texturing).
Switch brushes in that bottom panel, type and size both, to achieve different effects. There are easy peasy symmetry buttons at the bottom of that too- if your model needs to be symmetrical select what you need- you can do a lot of your modeling with symmetry to get the basic shape, and then take it off to do more detailing on either side as well.
Basic camera controls: Hold down alt and left mouse button rotates. Alt+crtl+left button zooms, alt+shift+left button moves. The scroll wheel does odd things in these modes as well that you may or may not find useful.
At a glance, I think the map you come with is 64x64, which is what you want, so you can even just bake over that and save it off. Once you've got your sculpting all happy (for starting out, try something simple so as to not get frustrated: I have a long line of wacky melty skulls I played around with, only some of which I've bothered to keep, but basic construction is one direction symmetry, poke some holes for eyes, poke a nose hole, and shove around the jaw. I wasn't going for realism, because I knew I couldn't attain it, as well as not really caring to achieve it), hit F10 in the Panels, and press that big Bake button in the Bake tab. Your rainbow image should now look like a different rainbow image, save that off as a tga, and ta-dah! you've got a sculpty!
Of course, make sure you save a new file often during this process so you can go back when you've messed up when trying to make it better and suchlike. I usually have 10 or 20 versions of even reasonably simple things, just in case I need to go back. Once you've got it sculpted, save off your final version, trash the earliers unless they have potential to turn into something else, and then you can move on to some of the evils of texturing. You've already gotten enough of a crash course here in the tools that you should be able to sort of muddle your way through it, I think.
Friday, December 28, 2007
Hack your UI!
The decimals allowed in the basic UI make fine tuning alignment a royal pain. But, you can edit the xml files and fix that! This wonderful person tells you how. There are also some other neat things you can do in that blog! (Hint: search for 'name="ColorTrans"' in the tools too, and up the max_val from 90 to 100, and be able to set things ACTUALLY transparent without scripts or textures!)
Tuesday, December 25, 2007
SLImageUploader, oh how I love thee
This sculpt was a test to push the system (basically...every vertex counts, and is required to be reasonably accurate, with this done in a 64x64 mesh, which it was), because my pirate hat...came out lessgood than expected. I also wanted to make this table (someday, I'll actually get around to making the legs, and texturing, and all that stuff). Firstly, I uploaded it with the default uploader, to see how bad that makes it:

Not only does it mush the details and can't manage a flat surface, LOD also wrecks it even more:

Something that is only really easy to tell when you're in SL, at the side seams it often doesn't quite match up. While SL's compression sort of wraps when chopping things into little bits and gluing them back together again, it doesn't do a great job of it. In textures this is generally not something you'll notice- although upload anything that actually depends on real pixel data, and yeah, you will (I've got a small texture I need to upload through SLImageUploader because it has very obvious seams...that aren't actually there).
Here you can also see where the top vertices all pull to one, because the top doesn't technically exist. I didn't have the vertices to spare to pull it all to the center, so I'll have to take care in my texturing. (Note: while this is taken of the default uploaded version, the good one is fairly similar, and identical in the vertex pulling)

Finally, what happener when I used SLImageUploader instead. Flat pristine surfaces, a little distortion but not even close to as much, and a generally much cleaner model. This is something I can work with. The other was something I could give up on sculpties with.

Things to still keep in mind: the interpolation in SL rounds off edges. This is good, in that things aren't all sharp and pointy because we've got limited points. This is bad when you want to make things with...sharp points. This is a problem that can be sort of gotten around by clustering a number of points to remind it you really do want that.

Not only does it mush the details and can't manage a flat surface, LOD also wrecks it even more:

Something that is only really easy to tell when you're in SL, at the side seams it often doesn't quite match up. While SL's compression sort of wraps when chopping things into little bits and gluing them back together again, it doesn't do a great job of it. In textures this is generally not something you'll notice- although upload anything that actually depends on real pixel data, and yeah, you will (I've got a small texture I need to upload through SLImageUploader because it has very obvious seams...that aren't actually there).
Here you can also see where the top vertices all pull to one, because the top doesn't technically exist. I didn't have the vertices to spare to pull it all to the center, so I'll have to take care in my texturing. (Note: while this is taken of the default uploaded version, the good one is fairly similar, and identical in the vertex pulling)

Finally, what happener when I used SLImageUploader instead. Flat pristine surfaces, a little distortion but not even close to as much, and a generally much cleaner model. This is something I can work with. The other was something I could give up on sculpties with.

Things to still keep in mind: the interpolation in SL rounds off edges. This is good, in that things aren't all sharp and pointy because we've got limited points. This is bad when you want to make things with...sharp points. This is a problem that can be sort of gotten around by clustering a number of points to remind it you really do want that.
Thursday, December 20, 2007
Code wrangling
Overview I shall try to keep updated of the code bits and bobs that will end up here.
Simple attachment animation code: a simple script to throw in an attachment that you want to always play an animation when held. Good for carrying things around with you.
Network server code: this particular has an object that, when touched, delivers all the items included in the server to the toucher, but also provides the basic framework for objects communicating with a server for other uses. Server code is some deeply guarded secret, and it was a pain finding this.
Ring scripts: code for scripting rings that guess your hand state, and adjust accordingly. I use something that evolved from this in all of my rings- it has more adjustability on the user's part written in, and the right/left bias is written out and adjusted in another script. The version I use is sort of a great huge mess because I'm not a coder, even worse than this one that I'm putting out there to get the theory out for people to use in their own products. I'm...embarrassed to show the full version. This one is messy enough, and that one just adds more crap in- I'm so not a programmer, I'm someone who codes when necessary, so I'm very clunky, as this will show. Introduction, right hand, left hand, and a simple supplemental helper script for getting rotation for hard coding. The same basic theory can be applied to scripting fingernails/claws, as well as even more tenuously applying to intelligent skirts- however this is waaaay overkill for the latter, and I suggest using that free script, AttachmentSet, instead, as it is a far more elegant piece of coding, and the server will thank you for the reduction in processes.
Simple attachment animation code: a simple script to throw in an attachment that you want to always play an animation when held. Good for carrying things around with you.
Network server code: this particular has an object that, when touched, delivers all the items included in the server to the toucher, but also provides the basic framework for objects communicating with a server for other uses. Server code is some deeply guarded secret, and it was a pain finding this.
Ring scripts: code for scripting rings that guess your hand state, and adjust accordingly. I use something that evolved from this in all of my rings- it has more adjustability on the user's part written in, and the right/left bias is written out and adjusted in another script. The version I use is sort of a great huge mess because I'm not a coder, even worse than this one that I'm putting out there to get the theory out for people to use in their own products. I'm...embarrassed to show the full version. This one is messy enough, and that one just adds more crap in- I'm so not a programmer, I'm someone who codes when necessary, so I'm very clunky, as this will show. Introduction, right hand, left hand, and a simple supplemental helper script for getting rotation for hard coding. The same basic theory can be applied to scripting fingernails/claws, as well as even more tenuously applying to intelligent skirts- however this is waaaay overkill for the latter, and I suggest using that free script, AttachmentSet, instead, as it is a far more elegant piece of coding, and the server will thank you for the reduction in processes.
Sculpty corralling
You can use tags to find all of my ramblings on sculpties, but it's kind of word soup in there. So here's an attempt at a handy dandy guide of what's where.
Step by step...badly. Sort of. Tips with no shiny pictures, because I am lazy:
Getting Started: A very quick and dirty crash course in how to get up and running. Use a premapped sphere, and jump straight in to using the modeling tools (the fun part!). This is to get your familiar enough to hit the ground running, it doesn't teach you how to master Blender. Because Blender is evil and complicated, and I don't know how to do most things in it.
UV mapping the hard way: Say you didn't use that premapped sphere to start out with, and in fact, did your sculpting first, and then decided you needed to map it. It ain't pretty, unless you go through a number of seemingly extraneous steps. If you do this, it is imperative you preview your sculpts before uploading, as getting them backwards is really easy.
Texturing sculpts: some quick and dirty tips to get your started in the world of texturing with Blender. Does not include advanced techniques, but at least gets you pointed in a vaguely decent direction to start.
Texturing and the Avatar mesh: how to import the av mesh into Blender, and a few things to do from there, as well as how to be able to paint on a sculpt to line up better with an avatar clothing texture (note: your mileage may vary, since we don't get to play with the real av mesh, just a vague approximation).
Importing Sculpt Maps to Blender: we've covered how to make an object in Blender into a sculpty. But what about taking one of those rainbow maps and making it into an object in Blender we can play with? Here's how.
Awesome things that make life easier:
Link to a pre mapped sphere: Find mapping a pain in the ass? You're in luck! Here, have a sphere to start with that's already had all that crap done to it. You just need to rebake when you've finished your sculpting.
SLImageUploader: example of mush to awesome with SLImageUpload. Also, if you're having some side seam distortion, this should fix it, because it doesn't use the stupid JPEG compression...which is idiotic when we're talking something where every pixel does matter. Yes, even when you tick lossless in the SL client, it lies like a filthy whore.
Extra tips for other problems:
Mirroring: a very brief couple of tips about what to do if you find your sculpt map is inside out in SL. This is why you pretty much always want to preview the sculpt in SL, even if you're then logging out to use SLImageUploader.
Sculpt Mapping: an overview of the different mapping modes you can set for your sculpt in SL. Generally you'll go with the default sphere, but the others do have their uses.
Sizing Sculpties Smaller: Say you need miniprim sculpties for something. Sculpts only natively go down so far, and there's no dimpling to save you. However, adjusting the map in Photoshop can shrink them down nicely.
Step by step...badly. Sort of. Tips with no shiny pictures, because I am lazy:
Getting Started: A very quick and dirty crash course in how to get up and running. Use a premapped sphere, and jump straight in to using the modeling tools (the fun part!). This is to get your familiar enough to hit the ground running, it doesn't teach you how to master Blender. Because Blender is evil and complicated, and I don't know how to do most things in it.
UV mapping the hard way: Say you didn't use that premapped sphere to start out with, and in fact, did your sculpting first, and then decided you needed to map it. It ain't pretty, unless you go through a number of seemingly extraneous steps. If you do this, it is imperative you preview your sculpts before uploading, as getting them backwards is really easy.
Texturing sculpts: some quick and dirty tips to get your started in the world of texturing with Blender. Does not include advanced techniques, but at least gets you pointed in a vaguely decent direction to start.
Texturing and the Avatar mesh: how to import the av mesh into Blender, and a few things to do from there, as well as how to be able to paint on a sculpt to line up better with an avatar clothing texture (note: your mileage may vary, since we don't get to play with the real av mesh, just a vague approximation).
Importing Sculpt Maps to Blender: we've covered how to make an object in Blender into a sculpty. But what about taking one of those rainbow maps and making it into an object in Blender we can play with? Here's how.
Awesome things that make life easier:
Link to a pre mapped sphere: Find mapping a pain in the ass? You're in luck! Here, have a sphere to start with that's already had all that crap done to it. You just need to rebake when you've finished your sculpting.
SLImageUploader: example of mush to awesome with SLImageUpload. Also, if you're having some side seam distortion, this should fix it, because it doesn't use the stupid JPEG compression...which is idiotic when we're talking something where every pixel does matter. Yes, even when you tick lossless in the SL client, it lies like a filthy whore.
Extra tips for other problems:
Mirroring: a very brief couple of tips about what to do if you find your sculpt map is inside out in SL. This is why you pretty much always want to preview the sculpt in SL, even if you're then logging out to use SLImageUploader.
Sculpt Mapping: an overview of the different mapping modes you can set for your sculpt in SL. Generally you'll go with the default sphere, but the others do have their uses.
Sizing Sculpties Smaller: Say you need miniprim sculpties for something. Sculpts only natively go down so far, and there's no dimpling to save you. However, adjusting the map in Photoshop can shrink them down nicely.
Subscribe to:
Posts (Atom)
